I have been wanting to make the candy apple on the October 31 cartridge and I wanted to try to make layers since there aren't any for this solutions cartridge AND I wanted to see how it looked with Glossy Accents. So, I cut the candy apple at 4 1/2" in three different layers. The first is the light color that I wanted for the stick. The second was done on Design Studio, removing the 'drippy' cuts that are on the actual apple and then cut in red to show an apple under the caramel and then the red stick portion trimmed off. The third is the caramel with all the cuts and the stick trimmed off. I was VERY pleased at the results and the Glossy Accents! The actual card is a red base with a plaid mat paper from the DCWV Hauntings stack. I cut the green strip across the top at 1 1/2" then the cream color at 1" and stamped 'Apple of my Eye' from a Studio G stamp and then added some fall colored rhinestones.
Thursday, September 30, 2010
Monday, September 27, 2010
Autumn Owl
Another MPS challenge, for Robyn's big celebration. This time, make a project with a bird. I decided to use the owl cut on the the Pumpkin Carving cartridge. I was trying to do something un-Halloween with it and I was thinking winter owl but, my husband thought autumn would be better. I cut the owl cut at 3 1/2" and then used DS to cut the blackout oval (I did a hide contour on the interior cut). I embossed the frame of the cut and the brown strip of paper with the branches embossing folder. Then, I used the Martha Stewart crafts Punch Around the Page Modern Garland punches to go around the entire mat. I used some American Crafts ribbon across the front and left the inside plain until I decide what I'm going to do with it.
Best Little Monkey
I made this mini card (2 1/2" x 3 1/2") for the MPS Challenge to make or use an envelope in your entry. I thought this would be a good opportunity to make a little lunch card for my son. I cut the envelope using the monkey key, using the envelope creative feature on the Sweethearts cartridge at 3". I glued a brown piece on the inside to show off the monkey better. The card is just a piece of paper from DCWV Animal Crackers stack at 2 1/4" x 3 1/4". I stamped the 'You're the Best' to a couple mounted sheets of card stock and added it to the front. We will write a little note inside and put it in his lunchbox!
Tuesday, September 21, 2010
Best Witches
Yes, another Halloween card today but, this one made with the 'A Child's Year' cartridge which I love. I don't think it gets nearly the credit it deserves. The reason I like it so much is because it's really versatile, especially if you didn't have many cartridges. It has LOTS of holiday cuts on it although, no layering. So, today I tried to create some layers! I cut the little witch from the Hallown2, shift key at 4". I only cut two layers, one cream color and one black. On the cream colored layer, I colored the girls socks and the pumpkin pail in orange using my Sharpies and then the broom stick and the pumpkin pail handle in black.
So, I cut the witches hat, dress and some shoes. I had to do some trimming to make the rest of the dress hem jagged and trim back the arms to show hands. When I was done, I ran them through the Xyron (front side down so that they would be sticky) and then glittered them with black Martha Stewart Crafts black glitter. When I was done, I used the Glossy Accents on all the black pieces and let them dry. Once they were dry, I used Orange Peel stickles on the hat brim and the hem of the skirt. I inked the edges and the broom bristles and the witch was done! I am happy with her & I LOVE the stickles.
The mat on the front is from the DCWV Amber Autumn stack. I like that this paper has more of a vintage Halloween look instead of the cute, fun Halloween. I inked the edges of the paper with the Cat's Eye Tangerine ink pad. The ribbon is KI Memories self adhesive ribbon. The sentiment is a Studio G stamp on black cardstock with a self adhesive frame from the Making Memories Spellbound adhesive set and the glitter pumpkins from the (you guessed it) Target dollar bins.
On the inside, I used the same cream cardstock in the mat on the front and punched the corners using a Fiskars corner punch. I inked it with the tangerine ink and then stamped the 'Best Witches' sentiment from Studio G, also in tangerine. The black cats were paper punches that were in a set from Cutting Edge.
Sunday, September 19, 2010
Halloween Argyle
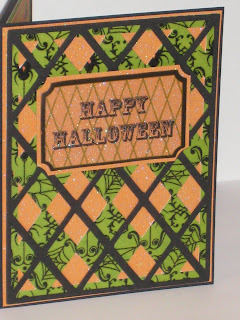
So, today's card I made for the CricutCardzChallenge blog challenge #42, to make a Halloween card using the card function of any cartridge. Well, I got to looking at my cartridges and I thumbed past the Argyle cut on the Wild Cards cartridge. Hmmm, to do the entire cut and make a Halloween cartridge without using a Halloween cartridge....that's sounds interesting. So, I cut the base card at 5 1/2" and then the orange glitter mat was cut from Core Couture 'Photo Shoot' paper by Core'dinations (love it). I cut the first layer of the argyle (the green) from the DCWV Hauntings stack and then the top layer in just solid black. The sentiment is another one of the self adhesives that came in the Making Memories Spellbound collection. I mounted it on another small piece of the orange glitter paper and then rounded the edges off by using a circle punch.
On the inside, I used another sentiment from the Cloud 9 Halloween Quote Cards set, and mounted it on some scrap green.
Saturday, September 18, 2010
Love you a Latte
Today's card is one of many I imagine I will make for the same person. My co-worker of 15 years was recently admitted to the hospital and they found two tumors on her lung. She will soon find out the results. No matter what the results are, she has a long road ahead of her.
Today's card started with the 'Love you a Latte' saying on the Just Because Cards cartridge. It is cut from the coffee key, words creative function, cut it at 4 1/2". The mat paper is from a Colorbok stack that I got at Walmart for $5. I'm not too fond of the coffee carafe that goes with this cut so, I cut the mug from the Joys of the Season cartridge at 3 1/2" with the shadow and the steam (the layers creative function). The cartoche that I mounted the sentiment on is cut from my newly purchased Sweethearts cartridge at 2 1/4 and 2 3/4".
Thursday, September 16, 2010
Hairy Scary Spider
More Halloween here! Today's card was kind of an experiment for me. I used the Spiderweb cuttlebug folder to emboss a white sheet and then tried to ink it with black so that you could see the spiderweb. I didn't love it but, it turned out ok. I inked the edges of the white card stock in black as well. I cut the spider at 4" from the October 31 cartridge using a sheet from the DCWV Hauntings stack. The sheet is green with a glossy back Halloween design around the edges. I also used the EK Success wide Spiderweb border punch. The sentiment is from Studio G and I mounted and pop dotted it. This was a quick card but, I think it turned out well for an experiment.
Tuesday, September 14, 2010
Whisking you a Wonderful Day!!
Today I have another card for my pastry chef cousin. :) Her BD is coming up so, I decided it was time to buy the From My Kitchen cartridge for myself. Any excuse, you know? lol. I started with a pale yellow solid base and then a mat from the DCWV All About Girls stack. I cut the apron using another sheet from the same stack but, using Design Studio because I wanted to remove the apple from the front. I cut it at 3 1/2" and then pop dotted it on. Then I cut the whisk's, I cut on metallic paper at 2" so that they looked like metal whisks. I wouldn't recommend cutting the whisk's smaller than that because the cut is so thin. I cut more than what I have on the card but, several didn't make it. I cut the word 'whisk' using the whisk key & the words creative funtion. I cut it at 1" and then added the 'ing you' from Plantin Schoolbook at 1" as well.
On the inside, I added a strip of the brown paper I used for the words and the 'scrap' piece of the polka dot mat on the front and then another whisk on top. The stamped sentiment is from the Hero Arts Big Hugs clear set that I got from Archiver's.
Friday, September 10, 2010
Midnight Moon
Another Halloween card today, can you tell I am looking forward to it? This one is a 5x7 inspired by the fabulous black glittered card stock that screams Halloween night, right? So, I started with a gray base and then the black glitter card stock as my mat. I cut the moon at 5" from the October 31 cartridge using Core'dinations Foundations Golden Pearl paper. The bat buttons are my first attempt at using a needle on cardstock. I was really happy with them. I found them at Archiver's...they are from the Little Yellow Bicycle, the 'Frightful Collection'. LOVE them! And then the tag sentiment....clear glitter adhesives from Making Memories, in their 'Spellbound' collection (Archiver's) along with a brad. It was blue with hearts and I didn't have any black so, I colored it black using a sharpie, it worked very well. Then I punched the corners with a Fiskars corner punch.
On the inside, I used a bat from the adhesive glitter collection mentioned above and then added some little 'bats' that are actually the punched corners from the black glitter mat. They have the same shape so, I thought I use them. The sentiment is from Studio G. I think this is by far my favorite Halloween card so far. :) Let me know what you think!
Wednesday, September 8, 2010
End of Summer Carnival Party
My son was invited to a Carnival themed birthday party so, I was trying to come up with a boy birthday card when I realized that I haven't done anything with my Summer Vacation cartridge and there are some perfect carnival cuts on there. I picked the ferris wheel. I cut it at 4" using the DCWV Haunting stack. Then I decided to create a shadow. I used Design Studio and did the ferris wheel at 4 1/4" and then did a hide contour on all of the interior cuts. Once I cut it, I trimmed the edges where the carriages were over hanging. In the center of the ferris wheel, I added a brad from a summer beach brad set that I got in the Target dollar bin (big shock right?).
I mounted the ferris wheel on the star printed paper from the Paper Studio A Boys Universe stack. I added two thin strips of yellow paper across the top and bottom that I also embossed with the Cuttlebug dots folder. The stamped 'make a wish' across the bottom is from a KI Icons birthday set.
At the top, the banner was cut using the Sports Mania cartridge. The banner key, border function at 1" on some striped paper and then pop dotted. I added some more banner and a quick Happy Birthday sentiment on the inside. Now, we're ready to go!
Monday, September 6, 2010
Bon Voyage
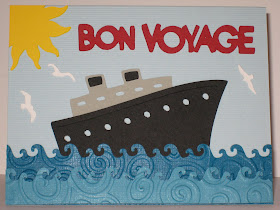
Today's card is one I made for a coworker who is retiring. She is going on a Hawaiian cruise so, what better than a card made with Life's a Beach! I started with the textured light blue card stock base and then added some waves. The waves were made with Core'dinations Color Core paper from the Aqua Blues collection that got at Pat Catan's. I cut the first color in a 1" strip an then the second color in a 1 1/2" strip then I used the Fiskar's waves border punch on them and then embossed them with the Sizzex swirls folder. I glued the larger one to the base and then pop dotted the smaller one for some wave dimension. The cruise ship I cut at 2 1/2" and decided not to use the smoke cut that goes along with it.
I cut the Bon Voyage out using the cruise ship key but, the Title Words creative key function but I cut the small cruise ship off. I cut the seagulls out using the Lighthouse key, shift, at 1" and then the sun, I cut using DS and removing the face. I cut it at 1 1/2" and then trimmed the sides so that I didn't use the entire sun but rather, part of it peaking from the corner. On the inside, I just added another trip of 'waves'.
Friday, September 3, 2010
Tricks or Treats??
I made this next Halloween card business size with an orange cardstock base. The mounted paper is from the DCWV 'The Haunting' stack. I decided to buy the circle punch cartridge for the Fiskars Everywhere Punch and while I was at Archiver's, I found the round clear stamps. So, I cut the circles using the everywhere punch which is 2", then I decided that I needed to cut a 1 1/2" circle (in black) using George & Basic Shapes cartridge. I stamped the Trick & Treat sentiments on yellow paper and then used a circle punch to punch it out (I think it's a 1" punch). I glued the yellow to the black and then pop dotted the black to the orange card base.
The center square sentiment is a stamp from Studio G that is stamped on yellow and then mounted on a 2x2" black square. I used a Fiskars four way corner punch on the corners and then some candy corn stickers and some striped ribbon from Hobby Lobby.
On the inside, I used a preprinted quote from Cloud 9 Designs. I pick them up at the Flower Factory. I decided to match the quote card up with the front by punching the corners and mounting it to a black mat with an orange strip of paper attached across the center. I also added a few more candy corn stickers.
Thursday, September 2, 2010
Birthday Dreams
Today is a birthday card for my boss. She's an animal lover so, what better than the Terrier from Create A Critter. The mounted paper is from the DCWV 'The Stack 6' and the scallop border at the bottom is a Fiskars border punch. The terrier was cut at 3" with the layers. I stamped the 'dream bubble' onto white cardstock and then cut it out. I then cut the bones inside using the terrier key, layer 3 shift, on Create a Critter. I cut them at 1/4", 1/2", and 3/4" sizes and then pop dotted the terrier and the bubble. The interior is a birthday wish sentiment from Scrappy Cat.