Sunday, January 29, 2012

Always Remember

I used the Paper Lace cartridge to create this 5 1/2" square card.  I cut the butterfly cut paper on K & Co double sided paper and I intended to use the green side but, the blue side looked so pretty on top of this chocolate brown paper. 

I cut the butterfly body at 2", twice.   I added a sentiment, some brown pearl gems, and inked the edges.  I only glued the bodies of the two butterfly cuts together and then pop dotted the wings to make them 3D
The ribbon was recycled packaging. 

The inside paper is from the DCWV Four Seasons stack and the sentiment from Fiskars.

Monday, January 23, 2012

Repurposed Holiday Gift Tin

I have to say that this repurposed tin creation is not my personnal style at all but, I love how it turned out!
I got the Trim a Tree cartridge last Christmas and still had not used it so, this is my first time using it.  I used printed paper from DCWV Ultimate Stack that had bells all over it.   I used my ATG gun to glue the paper to the metal tin.  Then, I added a solid piece to the front.
The cut is the bell from Trim a Tree at 4 1/2"and the stars have 'Peeled Paint' distressed stickles added. 
Sentiment is Inkadinkadoo, mounted and pop dotted with a little more stickles.  
I covered the lid by tracing the shape and hand cutting it and then topped it with a sheer ribbon bow that I made.  Another good tin saved from the recycle bin!!!

Friday, January 20, 2012

Blog Candy Winner!!!

Congrats Carri aka abusybee on winning my blog candy!!! I'm so sorry that I am just now posting but, I have come down with a severe case of Strep Throat and double ear infections.  It's been a very long, bedridden week!  So, I am sorry for the late update but, blog candy none the less, right!!!   Congrats Carri!!!  Email me at aidensmom 2005 at aol dot com.   Have a great weekend!

Saturday, January 14, 2012

Christmas treats for my deer? LAST DAY OF BLOG CANDY!!!!

This is a repurposed candy container from Sam's Club.  I used some black, white, and silver deer wrapping paper around the entire container and trimmed the top and bottom with white ribbon and some black strips of paper that I border punched using the Martha Stewart snowflake border punch.  
On the front, I mounted a deer cut from the Winter Wonderland cartridge, deer2, at 4" using My Mind's Eye Lost and Found paper.  I also cut the shadow for the deer but, had to trim off the legs that would have been added had a cut all of the deer layers.  I mounted the deer on a printed sheet from Theresa Collins 'Christmas Home' set that I also cut using the Martha Stewart border punch and I also used the corner punch as well (one of the punch around the page sets).
For the lid, I cut a circle the size of the lid and made a bow for the top and then tied the bow with a long thin ribbon and pulled that extra ribbon through a hole poked in the center of the paper circle.   I taped down the ribbon string and then attached the circle (with bow attached) with my ATG gun.

Don't forget to check my Jan 1 post to comment for the blog candy...this is the last day!!!

Friday, January 13, 2012

Elegant & Untraditional & BLOG CANDY

I'm still posting some Christmas work since I hadn't gotten to it during December so, sorry if you're already out of the spirit.  :)  I made a Christmas card that was not the traditional Christmas look.   Love how this turned out. 
I started with a solid brown card base and then a gold vellum mat and a brown flourish print that was flocked.   The print is from the DCWV Mainstreet stack.  I started with some unfolded cream raffia and then used a plain brown ribbon on top, that I hand pleated.  At the bottom of the ribbon, I added a gold glittered American Crafts brad.  

The fancy gold 'sprig' was cut from a plastic decorative pick and I sewed it to the card mat so that it was sure to stay put.  The mounted sentiment was cut from the Twinkle Toes cartridge.   This cartridge is great for frames!!  I cut the Stagefrgt cut at 2 1/4" with the layer.  The stamped sentiment is from Scrappy Cat.   I stamped it in brown onto vellum.
On the inside, I used a sentiment from American Crafts Dear Lizzy line and then added two leaves cut from the front sprig and another small piece of brown ribbon.
DON'T FORGET to check my January 1 blog post HERE for the BLOG CANDY that I still have listed!

Wednesday, January 11, 2012

Christmas Palm Trees ~ BLOG CANDY!!!


This is one of the few Christmas cards that I made this past Christmas.  It was a card for my husband's boss and he LOVED it.  He and his wife love tropical locations so I decided on palm trees.   I cut the trees from the Dinosaur Tracks cardridge at 4" and 4 1/2".  The larger was cut using the 'flip' function. 

I cut doubles of the palms and glued one of each onto the tree cut and then the top layers, I embossed with the Tim Holtz Burlap embossing folder and then inked them with Color Box Pheasant Gold stamp pad.   I had the mini Christmas light strands in a roll so, I cut them down and then taped and glued them to the trees.

The palm trees are mounted onto printed paper from the DCWV 'The Christmas Stack' and the sentiment is from TPC Studios.  
The inside sentiment is from another TCP stamp set and a strip of the mat paper.  A tip when you're using 3D elements, make sure that the envelope is a bit larger than the card so that the card will fit without tearing!!

Don't forget to leave a comment on my January 1 post for blog candy!  There are some great things there!!

Saturday, January 7, 2012

Pin the Nose on the Reindeer & Blog Candy!

Today I have a Cricut project that is NOT a card!!  ooohhh  ahhhh!   OK, so, seriously, this is a game that I made for my son's first grade Christmas party.   Unfortunately, my son wasn't able to attend the party because he came down with pneumonia right before Christmas but, I was told that the rest of the class really enjoyed it!

I covered a large piece of chipboard with navy blue specked cardstock (two sheets that meet right under the reindeer's right antler) and then hand cut the snow drifts and glued them on.   The trees were quick cuts from Joys of the Season in various sizes and the stem of the tree trimmed off. 
The reindeer that is flying over was cut at 11 1/2" using Create a Critter with all layers, although I didn't use the nose.   For the nose, I added a strip of the 'hook' part of velcro and then glued the 'pile' side to a large red pom pom, for pin the nose on the reindeer. 

I also added some white snowflakes that were cut from a different project via a Martha Stewart Crafts border punch.  Make sure you leave a comment on my January 1 blogcandy post....only one week left!!

Tuesday, January 3, 2012

New Year's Eve Favors

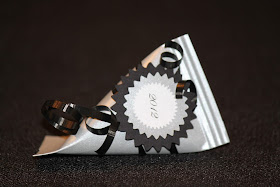
A quick post for the Sour Cream containers that I made for our New Year's Eve party this past weekend.  I pulled the instruction from http://www.card-making-ideas-and-instructions.com/sour-cream-container.html if you need them.  

I used a shimmery silver paper and then filled them with candy and tied black curling ribbon around them.   The medallions were made using Mother's Day Bouquet and I cut flower 36 (I believe) at 2" in black and then 1 1/2" in the same silver.   I printed the year and used a Martha Stewart punch at 1" to punch them out. 

Don't forget to leave a comment on my Monday post for a chance to win the blog candy that I have!!  Happy New Year!

Sunday, January 1, 2012

2012 Blog Candy!

Well it's officially 2012!  We had a great New Year's Eve!   I thought, since I am just busting back into the blogging world, I should do a give-away.   I know that Christmas is over but, I have some fun Christmas themed stuff to giveaway! 
A Paper Studio paper stack, 4 small acrylic stamp packs and three different colored gem packs!

So, make sure you're a follower and post a comment on this post by January 14 and I will choose a winner on January 15.  AND, if you post about it on your blog, come back and tell me that too and you will get a second chance to win.  I will send the package out to the following week.  Sorry, I can only ship within the U.S.  Happy New Year's fellow bloggers!