For the LOVE of PAPER!!!

Sunday, January 29, 2012

Always Remember

I used the Paper Lace cartridge to create this 5 1/2" square card.  I cut the butterfly cut paper on K & Co double sided paper and I intended to use the green side but, the blue side looked so pretty on top of this chocolate brown paper. 

I cut the butterfly body at 2", twice.   I added a sentiment, some brown pearl gems, and inked the edges.  I only glued the bodies of the two butterfly cuts together and then pop dotted the wings to make them 3D
The ribbon was recycled packaging. 

The inside paper is from the DCWV Four Seasons stack and the sentiment from Fiskars.

Monday, January 23, 2012

Repurposed Holiday Gift Tin

I have to say that this repurposed tin creation is not my personnal style at all but, I love how it turned out!
I got the Trim a Tree cartridge last Christmas and still had not used it so, this is my first time using it.  I used printed paper from DCWV Ultimate Stack that had bells all over it.   I used my ATG gun to glue the paper to the metal tin.  Then, I added a solid piece to the front.
The cut is the bell from Trim a Tree at 4 1/2"and the stars have 'Peeled Paint' distressed stickles added. 
Sentiment is Inkadinkadoo, mounted and pop dotted with a little more stickles.  
I covered the lid by tracing the shape and hand cutting it and then topped it with a sheer ribbon bow that I made.  Another good tin saved from the recycle bin!!!

Friday, January 20, 2012

Blog Candy Winner!!!

Congrats Carri aka abusybee on winning my blog candy!!! I'm so sorry that I am just now posting but, I have come down with a severe case of Strep Throat and double ear infections.  It's been a very long, bedridden week!  So, I am sorry for the late update but, blog candy none the less, right!!!   Congrats Carri!!!  Email me at aidensmom 2005 at aol dot com.   Have a great weekend!

Saturday, January 14, 2012

Christmas treats for my deer? LAST DAY OF BLOG CANDY!!!!

This is a repurposed candy container from Sam's Club.  I used some black, white, and silver deer wrapping paper around the entire container and trimmed the top and bottom with white ribbon and some black strips of paper that I border punched using the Martha Stewart snowflake border punch.  
On the front, I mounted a deer cut from the Winter Wonderland cartridge, deer2, at 4" using My Mind's Eye Lost and Found paper.  I also cut the shadow for the deer but, had to trim off the legs that would have been added had a cut all of the deer layers.  I mounted the deer on a printed sheet from Theresa Collins 'Christmas Home' set that I also cut using the Martha Stewart border punch and I also used the corner punch as well (one of the punch around the page sets).
For the lid, I cut a circle the size of the lid and made a bow for the top and then tied the bow with a long thin ribbon and pulled that extra ribbon through a hole poked in the center of the paper circle.   I taped down the ribbon string and then attached the circle (with bow attached) with my ATG gun.

Don't forget to check my Jan 1 post to comment for the blog candy...this is the last day!!!

Friday, January 13, 2012

Elegant & Untraditional & BLOG CANDY

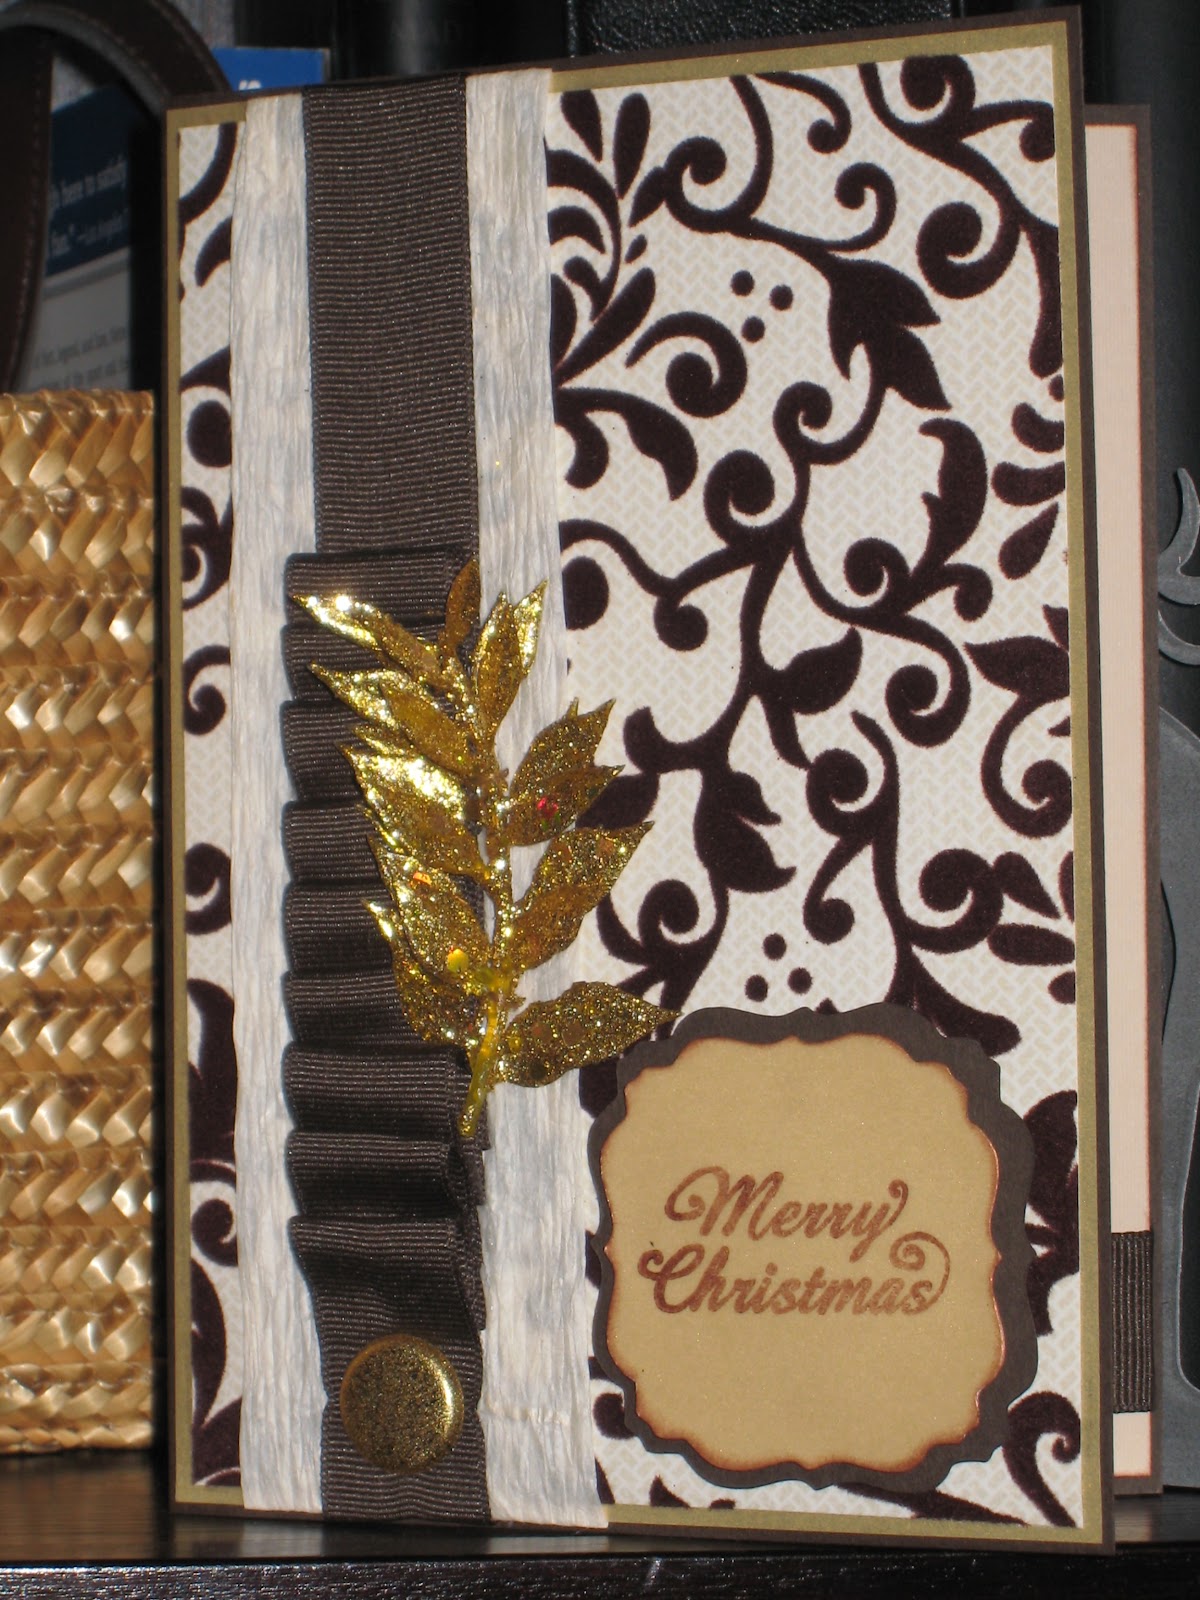
I'm still posting some Christmas work since I hadn't gotten to it during December so, sorry if you're already out of the spirit.  :)  I made a Christmas card that was not the traditional Christmas look.   Love how this turned out. 
I started with a solid brown card base and then a gold vellum mat and a brown flourish print that was flocked.   The print is from the DCWV Mainstreet stack.  I started with some unfolded cream raffia and then used a plain brown ribbon on top, that I hand pleated.  At the bottom of the ribbon, I added a gold glittered American Crafts brad.  

The fancy gold 'sprig' was cut from a plastic decorative pick and I sewed it to the card mat so that it was sure to stay put.  The mounted sentiment was cut from the Twinkle Toes cartridge.   This cartridge is great for frames!!  I cut the Stagefrgt cut at 2 1/4" with the layer.  The stamped sentiment is from Scrappy Cat.   I stamped it in brown onto vellum.
On the inside, I used a sentiment from American Crafts Dear Lizzy line and then added two leaves cut from the front sprig and another small piece of brown ribbon.
DON'T FORGET to check my January 1 blog post HERE for the BLOG CANDY that I still have listed!

Wednesday, January 11, 2012

Christmas Palm Trees ~ BLOG CANDY!!!


This is one of the few Christmas cards that I made this past Christmas.  It was a card for my husband's boss and he LOVED it.  He and his wife love tropical locations so I decided on palm trees.   I cut the trees from the Dinosaur Tracks cardridge at 4" and 4 1/2".  The larger was cut using the 'flip' function. 

I cut doubles of the palms and glued one of each onto the tree cut and then the top layers, I embossed with the Tim Holtz Burlap embossing folder and then inked them with Color Box Pheasant Gold stamp pad.   I had the mini Christmas light strands in a roll so, I cut them down and then taped and glued them to the trees.

The palm trees are mounted onto printed paper from the DCWV 'The Christmas Stack' and the sentiment is from TPC Studios.  
The inside sentiment is from another TCP stamp set and a strip of the mat paper.  A tip when you're using 3D elements, make sure that the envelope is a bit larger than the card so that the card will fit without tearing!!

Don't forget to leave a comment on my January 1 post for blog candy!  There are some great things there!!

Saturday, January 7, 2012

Pin the Nose on the Reindeer & Blog Candy!

Today I have a Cricut project that is NOT a card!!  ooohhh  ahhhh!   OK, so, seriously, this is a game that I made for my son's first grade Christmas party.   Unfortunately, my son wasn't able to attend the party because he came down with pneumonia right before Christmas but, I was told that the rest of the class really enjoyed it!

I covered a large piece of chipboard with navy blue specked cardstock (two sheets that meet right under the reindeer's right antler) and then hand cut the snow drifts and glued them on.   The trees were quick cuts from Joys of the Season in various sizes and the stem of the tree trimmed off. 
The reindeer that is flying over was cut at 11 1/2" using Create a Critter with all layers, although I didn't use the nose.   For the nose, I added a strip of the 'hook' part of velcro and then glued the 'pile' side to a large red pom pom, for pin the nose on the reindeer. 

I also added some white snowflakes that were cut from a different project via a Martha Stewart Crafts border punch.  Make sure you leave a comment on my January 1 blogcandy post....only one week left!!

Tuesday, January 3, 2012

New Year's Eve Favors

A quick post for the Sour Cream containers that I made for our New Year's Eve party this past weekend.  I pulled the instruction from http://www.card-making-ideas-and-instructions.com/sour-cream-container.html if you need them.  

I used a shimmery silver paper and then filled them with candy and tied black curling ribbon around them.   The medallions were made using Mother's Day Bouquet and I cut flower 36 (I believe) at 2" in black and then 1 1/2" in the same silver.   I printed the year and used a Martha Stewart punch at 1" to punch them out. 

Don't forget to leave a comment on my Monday post for a chance to win the blog candy that I have!!  Happy New Year!

Sunday, January 1, 2012

2012 Blog Candy!

Well it's officially 2012!  We had a great New Year's Eve!   I thought, since I am just busting back into the blogging world, I should do a give-away.   I know that Christmas is over but, I have some fun Christmas themed stuff to giveaway! 
A Paper Studio paper stack, 4 small acrylic stamp packs and three different colored gem packs!

So, make sure you're a follower and post a comment on this post by January 14 and I will choose a winner on January 15.  AND, if you post about it on your blog, come back and tell me that too and you will get a second chance to win.  I will send the package out to the following week.  Sorry, I can only ship within the U.S.  Happy New Year's fellow bloggers!

Tuesday, December 27, 2011

I've been Published!!!

So, in my craft world, the most exciting thing to happen this year is that I have been published in the January 2012 issue of Cricut magazine!   Not only have I been published but, FOUR of my cards were published!   I have agreed not to post any photos while the magazine is for sale but, I can tell you which cards and what pages they are on in the magazine.   I already bought a copy myself!  Couldn't be more excited about it!

Under the Stamping section, page 71, my 'It's your Day' card
Under the Quick and Easy section, page 87, my 'Damask' card
Under the Embossing section, pages 102 & 103, my 'Be Natural' and 'Need a Squeeze' cards

I hope you're able to check out the magazine and the other great work in there!!  Enjoy!

Monday, December 26, 2011

Sew, it's your Birthday!

Dress form cut at 5 1/2" from Summer in Paris, using Design Studio to remove the center cut.  Paper for the dress form is from DCWV Denim and then I used a brown sharpie to color the stand and the top 'knob', then used Glossy Accents to make them shiny, like finished wood.  The mat paper is from Cosmo Cricket Material Girl and Salt Air collections.   Ribbons and buttons from Making Memories.   The sentiment was printed on my computer and I added the sewing needle and mini safety pin.

The inside used the same papers and a Studio G sentiment

Thursday, December 22, 2011

Shoes in Every Color


This birthday card today was a quick card that didn't use any Cricut cuts but, instead a Fiskar's stamp set.  The base of the card is white cardstock and the mat is green.   The top mat is from DCWV Letterpress stack (which is so cool).  I stamped the shoe in green, brown, and yellow and then pop dotted them to green rectangles.  The sentiment is from the same stamp set and says 'If the shoe fits, buy one in every color'.

The inside has two strips of the Letterpress paper and a Happy Birthday sentiment.

Tuesday, December 13, 2011

I'm Back!!!!

Hello my blogger friends (do I still have any?).   I know, it has been forever since I have posted.   I was very busy with the final stages of our house building and then moving.  I really didn't think it would take as long as it did to get settled but, it did.   So, with that said, we are now moved and mostly settled and LOVING our new home!!!  I have a picture to share with you as well.   We won't have a concrete drive until April and no grass until next summer but, we are loving it.   Our neighborhood is perfect as there are 40 lots and they are all about 2-4 acres each.   The nice thing about it is that everyone has plenty of room and doesn't have to be on top of each other but, we still live in a neighborhood.   Our neighbors have been great too and I have made a friend already in the neighbor behind us.   Our son's are the same age and they played flag football together as well as wrestling together now.   So, it has been a huge blessing and we are very happy to be moved and settled.  

Now, on with the crafting!  I have missed crafting so much.   I have done a few things but, only things that needed done, nothing 'just for fun'.  I have some things to post so, I will start back to that this week.   I've also been collecting some things to do my first giveaway!!!   I'm thinking I might wait until just after the holidays and then do that.   I hope you are all well and staying crafty yourselves!!!  I have surely missed seeing every one's work!!!  Stay tuned, more to come this week!

Saturday, August 13, 2011

Carried Away.....

I'm totally loving today's card.   I was up late last night, crafting, which is rare on a Friday because I am usually exhausted.   I grew up in the country and often times, in the summer, we would see hot air balloons.   Somehow they are just a sign of summer to me.   I saw the 3D hot air balloon on a tag in a magazine and loved it!   This is a square gate fold card with a yellow base.   The blue mat is core'dinations paper and the hot air balloon print is American Crafts City Park collection (love it).   The balloons were cut using the Summer in Paris cartridge and then I trimmed them down a little for each layer and cut off the 'strings' and basket.  I put pop dots between the layers to make the stand up.   I also added some string of my own and a basket and then inked all of the edges of the balloon's layers.  

The frame behind the balloon was done with a Martha Stewart Punch around the page and then I put a piece of cardstock behind it so that the dots would pop out more.  The stamp is from Studio 112.   I used 4 different colors of twine from the Twinery, that I won from my blogger buddy, Amber, over at My 3 E Scrapbooking.  Thanks Amber!

I used the same border punch for the inside mat and then cut a printed sentiment out with the balloon shadow for the inside.  I had to cut the 'strings' off of the one inside because the paper was thin paper and the strings tore when cutting.  :(  I still like it though!

Leaving the Hive

My oldest niece is now a high school graduate and is getting ready for her graduation party.  Her school mascot is the Bee.   I created this card using the Sentiments cartridge.   The beehive was cut at 3" and the bee at 2".   I used this honeycomb embossed paper that I picked up in a stack by Carson, at the Flower Factory.  SUPER CUTE and fitting for the theme!

The card is a 5x5 square.  The mat paper is from the DCWV Lemon Flower stack (her school colors are green and yellow).  I have some silver plastic glitter ribbon from Christmas that I used a Fiskars border punch on (although you can't see it that well in the picture).   I added these to the left and right side with thin strips of black ribbon.   I pop dotted the hive and then glued the body of the bee but, pop dotted the wings to make them pop off the card.  The stamp is from a Hamton Arts set.

On the inside, I printed the sentiment 'we heard you would bee leaving the hive.  Congratulations' and stamped some little bees from American Crafts set.  I used the same border punch on the yellow strips inside as well as the silver strips and black ribbon, 

Saturday, August 6, 2011

Happy Birthday Little Lady

Hello all!  Today is a card that turned into a bag and matching wrapping paper for my friend's daughter's 3rd BD.   She loves Strawberry Shortcake and since that isn't a Cricut cartridge, I decided to just do strawberries. 
The main cut here is the sentiment, cut from Birthday Bash at 3 3/4",   It included a ladybug that I cut off to use later.  I used solid pink for the shadow and cut the sentiment using TCP Studio Spring Break stack.   The mat strawberry paper is from the DCWV Sweet stack and the frame is cut from the Just Because Cards cartridge, using the frame function of the Peas cut, at 6" from DCWV Nana's Kitchen paper. 
The berries are cut from Preserves and then embossed with the Swiss Dots folder.   I added a little American Crafts ribbon as well.

For the bag, I used the single Strawberry on Preserves and cut it at 4" I think.   I also embossed it and inked the edges of the leaf.    Have a great day all!

Wednesday, August 3, 2011

Sweet Berries

Today is another two style card day.   I'm trying to make two card styles for every card I make, for many reasons but I won't get into that.  I started with the Tacky Tuesday Challenge over at the September 9th blog.   The requirement is to use any kind of berry and the word berry.   The bottom sentiment includes berry but, it is hard to read because the font of that stamp isn't very thick.  I cut the raspberries from the Preserves cartridge at 3 1/2".   I used paper from Colorbok and stamps from My Pink Stamper and Scrappy Moms.   I embossed the berries with the tiny bubbles folder and then inked the leaves and attached.  I also added the little ball ribbon at the bottom.   BERRY SWEET!


Monday, July 25, 2011

For the Record Bouquet

Today's Flower Bouquet was a first for me in making a bouquet.   I made this for my mom using the Echo Park For the Record 6x6 stack and My Mind's Eye brads for the centers.   I cut all the flower petals using Mother's Day Bouquet at various sizes using the printed paper and coordinating solid colors.  
 The flower 'stems' are bamboo skewers that I inked in green and the leaves are hand cut from folded paper.   I embossed them using a Tim Holtz folder and then inked them and wrapped them around the stems and attached one side to the other, using ATG tape.


I inked all the flower petals and rolled the tips in and out.   The bucket was $1 at Target and I filled it with a piece of foam and added some green crinkle shreds and a bow on the outside.


Sunday, July 24, 2011

Good Luck in Kindergarten

Just finished this one for a little friend of my son's.   She's going to kindergarten next month.   The card was cut at 6" from Wrap It Up.   I cut the base in red and then the trim pieces in yellow.   I used a Sharpie to color in the window trim and the roof of the bell tower.   I cut the bell layer from the main cut.   I also added a white sheet on the inside.

For the inside, I traced the exterior and then cut out the sheet, stamped it with the sentiment and added a piece of $1 bin ribbon from Target.


Saturday, July 23, 2011

Under the Sea Favors


This is my last Under the Sea post!  These were the favors that I made for my daughter's party.   I bought the mini takeout boxes and then cut strips of paper to wrap around them and added a 2" octopus from Birthday Bash for the boy boxes and a 2 1/2" seahorse from Create -a-Critter, to the girl's boxes.   I added google eyes to all and stickles to the seahorses. 

The tags were printed on my computer and then mounted and tied on with curling ribbon.   That wraps up the week+ of Under the Sea party stuff.   I love having the parties for my kids as I know they feel special and it really doesn't cost much when you are using paper.  ;)  Now I need to start my wheels turning on next year's creations!!   Have a great weekend!