For the LOVE of PAPER!!!

Monday, April 30, 2012

Lil Dancer


I have a few little dancers that I know and although my daughter isn't yet, she could be!  This card was for my son's friend, who is a little dancer.   The mat paper is from Cosmo Cricket 2wentythr3e collection.  The ribbon is velvet laser cut adhesive from Oriental Trading. 
The dancer is from the Twinkle Toes cartridge, dancer9 at 4", with the layers and gems in her hair bows.   The sentiment on the front is from fiskars and the inside is from Scrappy Cat.

Monday, April 23, 2012

Apple Thank You's


I've been trying to get ahead in my crafting so that I am not scrambling when I want to make something.   I'm doing pretty good and I actually got to make these Thank you cards for my son's teacher.   She always sends them so, I figure it is a very useful gift. 

This set was made using Apple 1 from Preserves cartridge at 3 1/2", with the layers.  When assembling the apples, I used some black glossy paper under the layers, for the seeds.  The mat paper and the paper used to make the apple are from the Cosmo Cricket Garden Variety stack.  The solid cream paper under the apple was border punched with a Martha Stewart punch and then embossed with the Swiss Dots folder and inked the edges in red.  The sentiment is from Inkadinkado. 

And, although I didn't get a picture of it, I took the negative cut 'seeds' from the layers and I colored them black with a sharpie and glued them on the inside at the bottom. 

Thursday, April 19, 2012

Finding Birthday Wishes

Today's card is a birthday card for a male friend, which are always challenging for me.  The mat paper is from the DCWV Tradewinds stack.  I slowly tore the edges of the card and then slightly inked them to give the card an aged map look.

  The compass was cut from Wall Decor and More at 3 1/2" and an American Crafts brad added to the center.  The sentiment is from Fiskars and the inside sentiment is from Inkadinkadoo.


Tuesday, April 17, 2012

Birthday Calli Lillies

I'm still still loving the Art Nouveau cartridge as you can see.  The Calla Lillies were cut at 4" and I used white opal liquid pearls on the top layer of the lillies to make them stand out.  The printed paper is from the DCWV Serenity stack on the top and a white pearl underneath.   I used a Martha Stewart Punch around the page for both sheets.
I finished off the front of the card with a slider tag I made using a Paper Studio Punch and an Inkadinkado stamped sentiment.   The ribbon holding the slider is from American Crafts.
With this view of the card, you can see that it wasn't an even fold.   I cut the front and inch shorter than the back so that you could see the inside piece of pearl that I border punched along with a little strip of the printed paper.

Thursday, April 12, 2012

Need a Squeeze? Or Two? Published in Jan 2012 Cricut Magazine

This is the last post of the cards that were published in Cricut Magazine's January 2012 issue.   I made two variations of the same card and the second one, below, is the one that was published.  The lemon was cut from Just Because Cards.  I did a reverse embossing on the lemon using the swiss dots folder and I inked the leaf a little and then popped the lemon on the paper.  The mat paper is is from the K&Co. Citrus stack.   The strip of orange paper is core'dinations and the sentiment is printed from my computer.  I framed it and added some yellow gems.


So, the second version I like more.   I used two smaller lemons and different mat paper but, still K&Co.  I didn't add the gems but, I punched the edges of the frame and ran a ribbon through it. 

Sunday, April 8, 2012

Bird's Nest Themed Cake

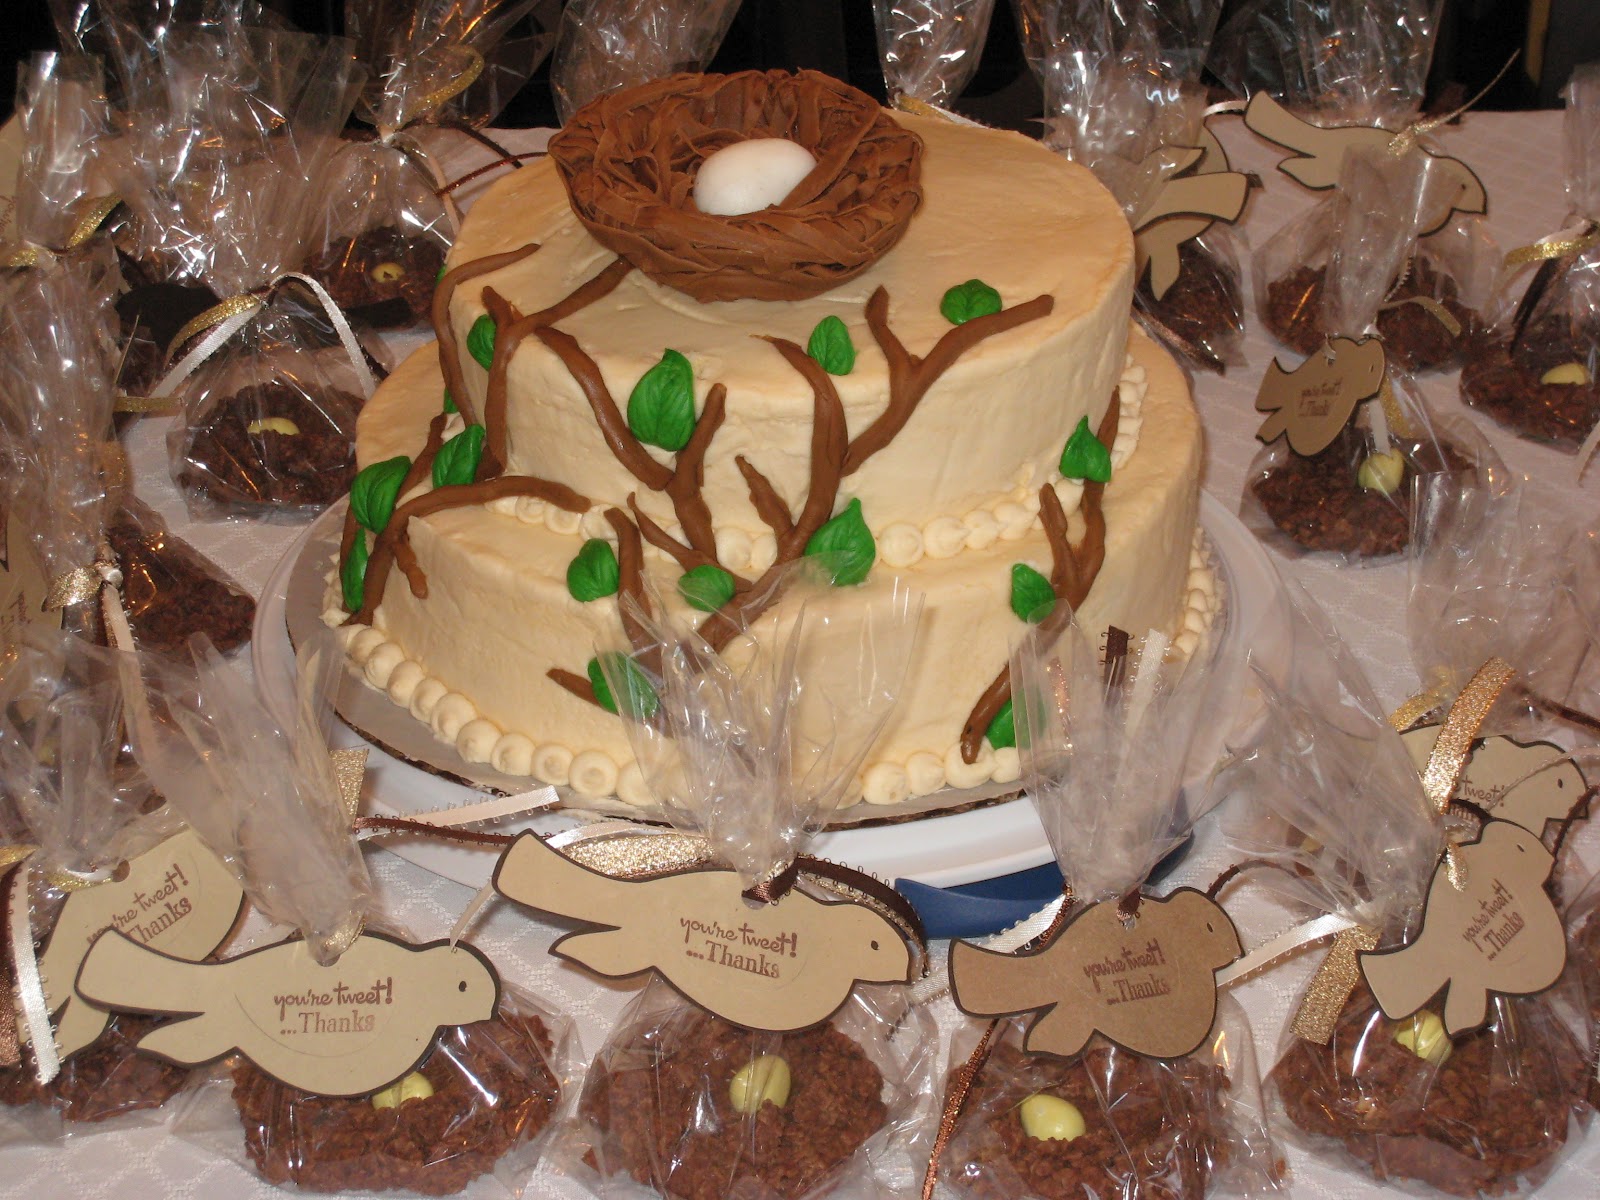
And, finally, although, not paper related at all, it is the finalle of the shower!!  My sister made the cake for us, which included the nest and egg on the top.   But, most importantly, the inside of the top layer was white cake that was dyed blue for a reveal of the babies sex!!!  It was a hit!!

Thursday, April 5, 2012

Grow in More than Just Inches


So, I finally added a color!!  Yes, it's going to be a boy and by the time they get to opening my card, all of the guests will know it's going to be a boy! 
I used the Songbird cartridge for this frame.   The cut is Frame2 - Bird - shift at 3 1/2" and then the Frame2 shift at 3 1/4".
The 'Grow in More than Inches' was cut at 2" from Straight from the Nest.   It's the flourish3 phrase with all the layers at 2".   I added some brown pearls to the frame and for the bird's eye.
This sentiment in the inside is from Fiskars.

Tuesday, April 3, 2012

Altered Nest Gift Bag

My coordinating gift bag was created from a store bought gift bag.   The bag had bright purple ribbon handles that I removed and replaced with this striped brown, cream and green ribbon.
I also added the three birds in the nest, cut at 7 1/2" from Wall Decor and More.

Sunday, April 1, 2012

Nest Favors


My nest themed favors were No Bake Cookies with Reese Pieces eggs.   I only got about 10-12 nests per batch because I dropped big scoops of the cookie mixture on wax paper and let them sit for about 10 minutes and then took a melon baller and pushed the round end down on the center of the cookie to create the nest and then I added the Reese Pieces egg so that it would stay in the nest.
I bagged each of them up and tied them close with three pieces of ribbon, brown, cream and shiny gold.   The tags were made using the Robin cut on the Storybook cartridge at 3", including the shadow.  The sentiment is a blend of Studio G and Fiskars.

Thursday, March 29, 2012

Altered Thank You's


As a gift to the Soon To Be mom, I bought some simple Thank You's that were printed in gold and I added the same nest and eggs that I used to make the invites.  The nest is from Create A Critter and the egg is from Straight from the Nest.   I included address labels and stamps for her as well!

Tuesday, March 27, 2012

Sea of Wonder

Oh how I love this octopus from Art Nouveau!!!  I've had my eye on this cut since I got the cartridge and then I read the Jinger Adams design team call HERE and I knew it had to be the the octopus! 

I cut it at 4 1/2".   Each layer was a different glittery or shimmery shade of aqua.  The papers were from the DCWV Royal Garden & Linen Closet as well as an Aqua shimmery vellum from the Paper Studio.   Once I assembled the entire octopus, I used a colored Sharpie to ink the edges, which really took some time.

The base of the card is a pale yellow and then a shimmery aqua and then a coral printed paper from Creative Imaginations South Seas stack.   I round punched the corners of all the layers and then used a Martha Stewart around the page punch on the coral top layer. 

The bubbles above the octopus are bisque colored liquid pearls and the net is black tulle that I folded together on the back of the mat, then taped down.   On the front, I cut the bottom of the tulle in a scallop pattern and spread it out.   The 'weights' on the ends of the net are round foam dots that I colored with a black sharpie and then added black circles the foam.   Once I was done, I used glossy accents to make the weights look shiny.

Last, the sentiment...   The frame was cut from the Songbird cartridge using Frame 2 at 2 1/4" and then the shadow at 2 1/4" and then another regular cut at 2 1/2".   I used a couple layers of foam dimensional dots on the frame and then added the printed sentiment that I inked to give some similar color to the shades of the card.
On the inside, I used the same papers but, corner punched the corners only and didn't do the edges.   The sentiment inside was also printed.  

Monday, March 26, 2012

Cherish Yesterday featured in Cricut Magazine

Today we have my second card that was featured in the January 2012 issue of Cricut Magazine. 
My husband got me the Damask Decor for Mother's Day and I had been itching to use it.  I think it is sooo beautiful!!  Unfortunately, I am using it, for the first time, to make a Sympathy card.  My bff's grandfather died this past weekend, at the age of 91.   I think that is remarkable, to live such a long healthy life and get to see your children as well as grandchildren and some great grandchildren, grow up.  I pray every day that my husband and I get that same kind of long life.
As for the card, I used the card function for the Damask3, cut at 5 1/2".  These are so pretty, you don't have to do anything to them but, I did decide to add ribbon, black stickles, and some gems.  For the ribbon, I just made a slit in the fold of the card, using a straight knife, that was the width of the ribbon, and ran it through.
On the inside, I cut a rectangle sheet in white and then added a strip of the teal paper and another piece of the black ribbon.   The sentiment is from Fiskars.

Sunday, March 25, 2012

Circle Damask Birthday featured in Cricut Magazine

Hello blogger friends!!  Today I am posting my first card featured in the January 2012 Cricut Magazine!!   I can't tell you how excited I was to get accepted and published.   Not only was this card published but three other cards of mine were published as well in that January issue. 
 My card today was for my older sister! I used a black base, purple mat and then gray top.   I stamped the purple and black circle decoration on the gray using a Scrapy Cat stamp.   The main cirlce Damask cut is from the Damask Decor cartridge at 4" and then I did a shadow layer at 4 1/4" as well and added a purple gem in the center.   The ribbon is raffia and black and the sentiment is from  Studio 112.

The inside I stamped with the circle again and then a Happy Birthday sentiment on top of the circle, in black

Friday, March 23, 2012

Baby Shower Rosette

Here you have my 2 FOOT Rosette for the Adding to the Nest baby shower theme.  I started with 10 pieces of 12x12 paper and border punched them with a Martha Stewart border punch of birds perched on branches.  When I was done with all 10 sheets, I scored each sheet at two inches and glued them together.
The brown layer was 10 more sheets of the bird3 cut from Ribbons and Rosette's at 6" and then scored each sheet and glued them together.   When I laid the brown on top of the off white, I decided not to bring all the sheets together in the middle.  I laid the brown on top of the off white and left only about two inches showing of the off white and then glued the brown on. 
The top layer is metallic vellum paper that I scored.   I added a large round circle to the top and then the words "Welcome to the Nest' cut at 6" from the Straight from the Nest cartridge, with the shadow.  NOTE: that you have to use the 12x24 mat to cut the phrase at this size.   The 'Baby' is the baby boy phrase from B is for Boy at 3".
Last, I added some feathers that I cut using Straight from the Nest in various sizes between 2 1/2" - 7".  Hope you all have loved this as much as I do.   It took some time but, it was sooo worth it!

Monday, March 19, 2012

Adding to the Nest Invitation

I am starting to add some details about the Party Ensemble that I posted previously.   To start, we have the invite.   I started with a chocolate brown 5x7 sheet that I rounded the corners on and then an off white layer that I rounded the corners on and border punched with a Martha Stewart border punch that features these cute little birds perched on branches. 
The top layer is a gold metallic vellum from The Paper Studio (Hobby Lobby).   These printed so well with the invite information!  I added a strip of cream and gold ribbon across the top and then added a nest cut from Create A Critter.   It's the Accessory cut of the Chick, cut at 1 1/4" and I cut two of them.   The first one, I glued to the invite and then I added the egg, cut from Straight From the Nest.   The cut was the Nest Shift, using real dial size at 1 1/4" and inking the edges in a tan color.   Then, I added a little real feather and a second nest cut on top of it, that was attached using pop dots.  
I love the way that these turned out because it'd very elegant versus 'baby'. 

Saturday, March 10, 2012

Adding to the Nest Party Ensemble

Hello everyone!  Today is  BIG post kind of day!   Over at the Paper Crafts blog, they have a challenge to create a party ensemble.   The challenge is in celebration of their new book, Party Ensembles.   Check it out HERE.
So, my ensemble is done.   I would have liked to do more but, honestly the 2 foot rosette sign has really caused me to lose sleep!!  It took an entire day for me to do but, I LOVE IT!!!   I will give some details but, not too much.   I'll do some posts to provide the details of each item later.   But for now, here it is.   The theme is 'Adding to the Nest' and it's for a baby shower.

The 2' rosette was made using a Martha Stewart border punch, my scoreboard, my Cricut, the Ribbons and Rosette's cartridge, the Straight from the Nest cartridge, paper and a hot glue gun!

Included with the Rosette Sign is a decorative napkin ring, an invitation, a favor and a tent card for the food. 

The invite and the tent card feature the Martha Stewart border punch with birds perching on branches.  The invite is three layers with a chocolate brown, a tan, and then a gold metallic vellum paper that was printed with the invitation.   I added a nest from Create a Critter, a little egg and a real feather to accent.
The tent card was a chocolate brown layer with a tan layer and then chocolate again and a printed sheet that I inked a little to relieve the stark white color.

The favors are one of my favorite parts.   They are No Bake Cookies with a Reese's Pieces egg (since this is that time of year).  The tag is from the Storybook cartridge with a stamped sentiment.   I tied the tag on with three different colors of ribbon.
And the napkin ring was made out of the gold metallic paper, border punched with the Martha Stewart punch, again, and then attached with some glue tape.   I also added the same three ribbons around the napkin ring, as I did the favor.  I really love how this all turned out!!!

Saturday, March 3, 2012

UpCycled Die Cut

So, I saw Emma's a couple days ago over at My Creative Time,  for a NON Cricut card and I knew just where I needed the start!  It's amazing how much usable stuff there is in kids toy packaging!  This playing card die cut was from a LaLaLoopsy magician doll that my daughter got for Christmas.  It was just spot glued on the inside of the box.  I couldn't throw it out because it seemed perfect for a card!   I didn't alter the cards at all.

I started with a white frame and then a red mat.   I cut the mat a little smaller than the white frame and then I border punched the side with an EK Success border punch and then I inked the edge in black.   The vertical border paper I used was from the DCWV Travel Stack.  The sentiment is a stamped Studio 112 sentiment that I mounted.  The little hearts, diamonds, spades, and clovers were left over from the border punch so I added them as well.

I didn't add an inside sentiment because I thought this could be a good wedding or Valentine's Day card but, I did make the inside match the front, with the border punch.  Although rarely done, not one Cricut cut used on this one!!!

Monday, February 27, 2012

Elegant Negative Cuts??


I cut some large silhouette cuts from the Damask Decor cartridge a few months ago and the negative cuts that were left over were very pretty and I couldn't throw them out.   So, I started making some cards with them. 
This one is the negative cut from Damask Silhouette 36.  This is a business size card.   The mat paper is from Colorbok and has a light swiss dot pattern so, I used the Swiss Dots Cuttlebug folder to emboss the black strip of paper down the center.  I added some sheer gray ribbon from Michael's and then a mounted Scrappy Cat sentiment.

Monday, February 20, 2012

Slimey Little Valentine Alien


Happy post Valentine's Day!!!   This is my son's valentine.   I made it after a challenge from Miss Erin at DCWVdiary and you can see it featured on her blog right HERE.   You can also find this one pinned by her on her Pinterest site, which I was excited about!  I just love her and her blog.

I was inspired by the mat paper that was from the DCWV Truly in Love stack.   And then I decided on the alien from B is for Boy, at 4 1/4".  The papers for the alien were also from the stack and I added the green google eyes.

The sentiments are from Studio G and the front sentiment was attached with a heart brad.  The drippy border is a Martha Stewart border punch with a strip of black ribbon above.

And, on the inside, I used a heart punch to cut out the little piece of black glittered poka dot paper, cut out from the stomach of the alien, 

Monday, February 13, 2012

Love Bug

A little Valentine's card today for my daughter this year.  The ladybug is from Create A Critter, cut at 4".  The phrase was cut as well, at 2 3/4" and using the red glittered paper for the word love.   I used red glitter paper to cut the wings and then glued the dots from her wings onto the antena's. 

The mat paper is from Martha Stewart's 2011 Valentine's Day stack.   The die cut hearts are from the K&Co. Smooch line and the border is from the Target dollar bin.   On the inside, I added a strip of paper and a TPC sentiment.  Happy Valentine's Day!!!