For the LOVE of PAPER!!!

Monday, February 21, 2011

Goooooooo Irish


My husband is a huge Notre Dame University fan. For his birthday I made him this easel card using Varsity Letter and Design Studio. The ND monogram is about 4" tall. The background football field was all cut on the trimmer and then the lines glued down. The uprights are cut from the football cut on the Sports Mania cartridge and the football button is from Making Memories.


The inside was two, 2 1/2" x 6 3/4" sheets mounted. The top one I added a border sticker from a scrapbook ND set and then I printed a sentiment on my computer. On the bottom half, I used more stickers from that same set and then pop dotted so that the card will stand


Monday, February 14, 2011

Key to Your Heart

HAPPY VALENTINE'S DAY!!!

Today's card is a creation that I am giving my little sis, The Cricut Crazed Lady, for Valentine's.   She loves the trendy old skeleton keys so, I am busting out my Sentimentals cartridge!  I cut all three keys at 3" in different silver colored shimmer papers and then black shadows.  One of them had a hole at the top but, the other two, I punched the hole in.  I bought some black jewelry chain in the jewelry making section at Joann's.   It was on sale so I think I paid like $2 for several feet of it. 

The card is a 5x5 black base with pink and silver metallic paper from the DCWV Metallic stack.   I punched the bottoms using the border punch from a MS all around the page punch.   I used my Crop A Dile (really into it now) for the eyelets in the top corners.  

Since the chain is real, I didn't want to run it through the eyelets because it would be bulky on the back so, I threaded some black thread through the chain and then taped the thread onto the back of the card.  The keys are all pop dotted and the sentiment was printed on my computer and then I inked it in pink and mounted it to a small piece of the metallic silver.
On the inside, I used two strips of the pink metallic on the top and bottom of the card.   I used a black piece and then border punched it across the top and bottom and then I added the rest of the sentiment in the center.  The lock was also cut from Sentimentals at 2 1/2" using some other metallic papers.  

She loved the card!!

Saturday, February 12, 2011

Stained Glass

Ornamental Iron was one of 15 cartridges that my fab husband got me for Christmas and I love it.  When I look at a couple of the cuts though, they remind me of my church and the fabulous stained glass windows there.   This card was made using some different techniques and materials that what I have used before.  

The base is a really light yellow color and then a light blue shimmery mat from the DCWV Linen coordinating stack.   I inked the edges of both using black ink.  I first cut the Gate5a cut at 6" from black cardstock.  

So, here is the new material and technique portion:  the stained glass.   Since overhead presentations are now a thing of the past, my office had tons of the transparency film in the cabinet that they were going to throw out.   I took it all!   I used a transparency sheet, colored tissue paper and decopauge to create the stained glass.   When I made the stained glass, I used bright colored tissue paper and made the collage big enough for the cut plus some.  When I did cut it out, I glued the Ornamental Iron cut to the shiny transparency side, not to the side that the tissue paper was glued to.   I also added a sheet of solid white to the back of the cut so that the collage would appear bright, like light was shining in the window.

I decided I wanted to use the sentiment (from G Studio) and put it on a sash type ribbon banner,   All of the options I had weren't right though so, I used a piece of ribbon and attached it to the front of the card with two black brads and then the sentiment mounted on a scrap of the yellow and then on the shiny blue.

On the inside, I cut the gate10d (I think) at 12".   WOW, was this interesting!   I wanted the cut to be about 1" tall and 4" wide to use the remaining 'stained glass' but, at 1", the cut was barely visible.   I had to check it out on my Design Studio to see what the deal was.  At 12", it cut about 5x1".   I trimmed off the blocks on the edge of the cut and it worked perfectly.   I should also add that when I went to cut the top block layer, using the shift key, the machine went was down on the paper to start cutting.....weird.   I did cut them though in the shiny blue and added the stained glass to the back as well as another light blue sheet below. 

I have to say I really LOVE how the stained glass turned out!   Not sure I will be able to send it.  :)

Monday, February 7, 2011

Blooming Love

Today's VD card is one of my favorites.   I had cut the tree a while back, for a different project and then decided not to use it.  I came across it and decided to make this 'tree of hearts'.   The tree is from the the Cindy Loo cartridge, cut at 4".   The hearts were all cut using two different punches and pink, red, white and silver glitter paper.  

The mat paper is from the American Crafts Dear Lizzy spring pack (super cute), the grass and cloud are part of the paper but, I added some cotton to the cloud to make it look more like a fluffy cloud.

The sentiment is printed on my computer and the corners are from a Uchidy punch.   I used stickles on the hearts and ultimately added two little bird stickers because I accidentally got ink on the card!   I think it turned out well though ;)


On the inside, I printed the rest of the sentiment and used a Fiskars punch on the corners and then added the Stickles!   Love is Blooming, I hope it is for you too!  

Sunday, February 6, 2011

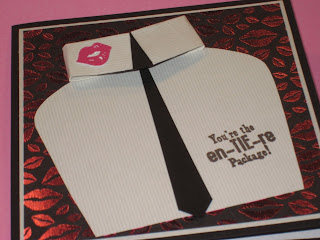
Is that Lipstick on your Collar?

I needed to make a VD card for my husband and I hadn't gotten to his yet but, I got some inspiration from a couple of blogs so, here is it.....lipstick on the shirt collar!

I wanted to use the lip sheet from the DCWV Rock Star stack and I wanted to use the lip cut from the Tie the Knot but, wasn't sure about the rest.   Then I got the idea and looked through my cartridges but, couldn't find a shirt and tie so, I figured it couldn't be that hard to make by hand and have the collar a little 3 dimensional.  So, the shirt & tie is entirely formed/cut by hand.  The paper for the shirt is black cardstock and a pinstriped sheet from the DCWV Linen stack.

The lips were cut at 1/2" using only the blackout and top layer of the lips from the Tie the Knot cartridge.   The light colored mat is also from the Linen stack and the pink lip sheet is from the DCWV Rock Star stack.   The sentiment is from the Scrappy Moms 'Charmed Life' set. 


On the inside, I used a sheet of white cardstock and an EK Success punch on the right side with a strip of the lip paper down the left side.   Hope he likes it.  He's truly is one of a kind!

Saturday, February 5, 2011

Stylish Blogger Award

One of my fabulous blog friends, Cindy, over at In Love with Paper, has awarded me with a Stylish Blogger Award. 
Upon receiving this award I must:


1) thank the person who gave this award to me and link it back to their blog
2) share 8 things about myself
3) pass this award to 8 other individuals that I have recently discovered
4) leave a comment so that they can pass along the recognition!

Okay, eight things about myself:

Eight things about myself:
~I am loving this winter weather because life has slowed down a little~
~my goal for this year is to be more efficient although I already keep myself really busy as it is!~
~I have two GREAT kids but, I could never be a stay at home mom~
~I love to shop as much as paper craft~
~I start planning my kids' birthday parties MONTHS in advance~
~I've been with my company for 15 years~
~My little sis is new to papercrafting, check her out, Cricut Crazed Lady~
~I love Notre Dame football~

The eight FABULOUS ladies that I am passing this onto are:
~My little sister, Ash, at Cricut Crazed Lady~
~Ashley at Crafty Amour~
~Miss Bliss at Miss Bliss~
~Diana at Daisy Love Creations~
~Kim at Kimi Kraftz~
~Amber at My 3 E Scrapbooking~
~Shauna at Craftee She~
~Anita at Scrapping with Glitter~

Keep sharing your great work and inspiring everyone!!!   Great job ladies!!!

Thursday, February 3, 2011

Kitty Love with a Wobble!

I think this cutie kitty card is going to be for my daugther.  The cat was cut using Create a Critter at 3".  I decided to use fun flock and make her furry.   If you're new to fun flock, there are a couple of tips:

1.  run the item through your Xyron upside down to get an even sticky surface.
2.  Once you're run it through, if you have the larger Xyrons, like I do, you should take your glue remover (this is an uneven surface rubber eraser like item) and remove glue in places you don't want it.   For example, I rubbed it over the cuts for the whiskers, over her eyes, mouth and ears to get rid of excess glue that I don't want to fight with once I add flock.
3. Pour the flock onto your item, over top of a piece of paper so that you can pour the excess flock back into the container.  Once you have the entire item generously covered with flock, use your finger to press the flock into the surface of the item.  Then rub off excess.

  I decided not to use the Cricut nose for her and instead used a heart brad.   Then, I used cotton candy stickles on the inside of her ears and black diamond stickles on her whiskers.   I also used stickles on her bow and added a big 'diamond'gem. 

So, I made the kitty wobble as well which was a first for me.   I have seen the action wobbles but, I decided to try to make them myself so, I bought some 26 gauge copper jewelry wire for less than $3 and cut about a 2" piece.   I wrapped it around my finger and then taped it to the card and the other side to the kitty.   It worked perfectly.   NOTE:   My first instinct was to make a larger wobble but, it doesn't work well, it only allows your item to wobble all over the place versus wobbling in the spot you want.   Next time I do one, I will take a picture of the wobble inside as well, sorry I didn't think of that until now!

So, when I went to cut the pillow, accessory, I assumed I should cut at 3".  It was huge.   So, I re-cut it at 1 1/4".   I ran it through the Cuttlebug using Swiss Dots and then added the 'fringe' ribbon on the bottom.  The stamp sentiment is from a G Studio mini set that I picked up for $.49 on clearance.   I stamped it on the pink scallop that I cut using the Preserves cartridge, the Apple4, lid cut at 1 1/2".

The mat aqua paper has xo's on it and is from the DCWV Madly in Love stack.  Then, I cut the scallop cut, also using Preserves.   The cut was the card cut on the Plum2.   I had to cut it using DS though because I needed the cut to be 5 1/4 x 4" and I used the DCWV Christmas Glitter stack for it, in white.

The inside, I cut the mat on white cardstock by going into the DS frame about and just hiding the inside cut of the frame.  I inked the edges in pink and then stamped the sentiment and the little paw prints in the same pink.  Have a great day everyone!

Angie

Wednesday, February 2, 2011

Balls of Holly


Today's card was my submission for the ProvoCraft Facebook Card challenge.  They posted the challenge a couple of weeks ago on FB that they were going to have a handmade card challenge that required you to use one of three cartridges (Don Juan, Winter Lace, or Home Decor) and something from Anna Griffin.  And, the card had to be delivered by Tuesday Jan. 18.   I didn't win but, I was really happy with my card!
So, the only cartridge from the three that I had was the Winter Lace and the only Anna Griffen product I have is the Holiday Traditions stack.   I wanted to do a VD card but, once I started I decided to leave it as a Christmas card.   I cut the second snowflake cut on the Winter Lace cartridge, layer included, three times.  I cut the first at 3 3/4", the second at 3 1/2" and the third at 3".   I cut them in different shades of green and pop dotted each layer to appear as a three dimensional ball of holly/kissing ball.  I added some dots of red stickle to the top layer to appear as berries and then a piece of gold and green ribbon to 'hang' it from and a handmade bow on the top.   The mounted paper is a flocked damask from that Anna Griffin stack, on a cream colored shimmer paper.  The corners were all cut with a Fiskar's corner punch and the sentiment was printed on my computer and mounted on gold and then green to match the rest of the card.   I was so pleased with this because I don't think it looks like a snowflake at all.


On the inside, I continued the sentiment of 'Deck the Halls with balls of Holly' and then 'Happy Holidays'.  I mounted it on the same green, using the same corner punch and a piece of the gold ribbon.   The cream paper is the same shimmer paper as the front.   Again, I was really pleased with this card.  Thanks for taking a look!

Giveaway at Queen of my Craftroom

Just to let you all know, there is a giveaway going on at Queen of My Craftroom when she gets 200 followers!

Thursday, January 27, 2011

Kiss Me Frog

Today's card was inspired by the Kiss Me sentiment that came in a card making kit that I picked up 2 years back after Valentine's Day at Target and a couple challenges that are out right now.  The sentinment is glittered and pop dotted and then my crafty little sis, Ashley, the Cricut Crazed Lady, suggested a frog.   I picked the frog from the Sweethearts cartridge, cut at 3 1/4".   I only cut the shadow, in a light yellow, and the main cut, in a green/yellow dot paper from Making Memories.  I inked them is the moss colored Cats Eye pigment and then used Studio G cranberry and inked the crown that it cut,   You can still see the dots but, it's red and not green which is good.   I added some small black gems to the crown, google eyes to the frog and a black string for his mouth. 
I used a red A2 card base and then matted a strip of the green dot paper onto the striped sheet from the DCWV Citrus stack.   I ran a ribbon over the seem that is pink, green and red, it's from Michael's.  ONce I had it assemebled, I thought it needed something else so, I added the shiny heart confetti .  
Oh, and on the inside, I mounted pink paper with a strip of the green dot that I punched some hearts out of.   I inked them with the same green as the rest.   I think it turned out adorably!!!

Monday, January 24, 2011

Dad BD


Today's creation is for the MPS BD challenge and was an effort by me to use a really neat cut from Lacy Labels.   I had cut the bliss round cut on Lacy Labels for my Love Flourishes card a couple days ago and the top layer was really cool looking on the pewter shimmer paper I used so, I wanted to use that square, that the bliss cut was cut out of.  
The card base is an aqua blue color and then navy blue mounted on top.   The white paper with the gray print is from the DCWV Alphabet stack (one of my favorites).   I mounted the Lacy Labels bliss cut onto that as well as some 1" strips of the aqua color paper in a cross pattern around the Lacy Labels cut.   I stamped a sentiment from Scrappy Cat and then added some aqua colored square brads to the corners.


On the inside, I mounted a smaller sheet of the navy blue and then the white/gray sheet on the top and an aqua strip onto that and a different birthday sentiment from Scrappy Cat.

Sunday, January 23, 2011

Hey Cupcake

Today's card was inspired by two things, my friend who is a baker and mainly of cupcake creations and The Fantabulous Cricut Challenge.  
So, I got a Crop A Dile from my husband for Christmas but, I had yet to use it so, I decided this was the time.  I cut this card 3 1/2 x 6".  I decided to have the 1/2" across the top be a place for my eyelet's that I was going to mount with my Crop A Dile so, I scored the card at 5 1/2", 6", and 6 1/2" and then sealed the 1/2" top with ATG tape.   The polka dot paper is from the new DCWV Dots, Stripes and Plaids.  I added a strip to the 1/2" section across the top and then a piece of red dot ribbon from Michael's in a way that you can 'hang' the card if you want. 


I cut the cupcake from the Once Upon a Princess cartridge at 3 1/4" but, I decided to cut the main cut twice and just trim the icing part off the top of the pink one.  The base cut was brown and then I traced the bottom a little larger than it was, cut it out of red paper and ran it through my Fiskars crimper so that it would look like a real cupcake holder.   I also inked the edges of the frosting and a little around the crease cuts (it looks much better in person).  I cut across the top with pinking shears and added some little red heart confetti as sprinkles and then pop dotted it onto the card.  
Across the top, I added a strip of red paper that was crimped and then a line of heart stickers.   The sentiment is from G Studio and then mounted on a brown piece of paper that I punched with an EK success heart banner style border punch.

On the inside, I mounted another sheet of the pink paper and put a strip of the dot paper across the top and border punched the bottom with the Fiskar's punch.  Many more projects lie ahead with the Crop A Dile!!!
Saturday, January 22, 2011

Cricutolgy Giveaway

So, Janice, over at Cricutology is having a giveaway for reaching 100 followers.   She's giving away a Sizzex embosser!   What a great giveaway.   I'd love to win one because my little sis is new to paper crafting...well, I should say, just got her Cricut and doesn't have an embosser.   She uses mine but, she's been drooling over getting one.   She's a newly graduated college student so, she can't really afford it right now but, I'd love if one of us won!!!   Check out Janice's giveaway and her work!!! 

Friday, January 21, 2011

True Love Flourishes

My inspiration for this card started with the red flourish TAPE down the left side of this card.   It was a dollar bin find at Michael's a couple of months back.   It's clear with the red design so, it looks great on white!   I started with a black card and then a red layer and then the shimmer white top layer.   I embossed the top white layer ucing the Textile Cuttlebug folder.   The sentiment itself is from a Martha Stewart V-Day adhesive pack and then I mounted it on the 'bliss' cut from the Lacy Labels cartridge, cut at 3" to ensure room enough for the sentiment sticker.  I pop dotted the entire sentiment and then glued on the two red heart gems.
On the inside, a sentiment stamp from TPC Studio, Hugs and Kisses stamp set and two strips of the white shimmer paper down each side of the red.   Loving Valentine's Day!

Sunday, January 16, 2011

An Iron Gate

Today's card is for the Cricut Cardz Challenge for this week.   The challenge is to make a card or layout using the colors White, Black and Red only.    The first cartridge I thought about was Ornamental Iron cartridge.    I started by using the shadow for gate10 at 6" and welding them together using Design Studio.   I then cut the shadow function again but, at 5 3/4".   I cut the window function of gate10 then using this high gloss black paper.  It's simialr to using Glossy Accents on the entire sheet.  It cut very nicely and looks like real rod iron. 

The bird on the front is the third bird cut from the Serenade cartridge, at 1 3/4".   I inked the white wing slightly so that it looked red but, not as dark at the top layer and I added red stickles to the flourish in the body of the bird and a black gem for the eye.  The sentiment is a Studio G stamp that I got this weekend at Joann's $1 bin, stamped onto white and then mounted on the high gloss black and then the red. 


On the inside, I cut another shadow layer and then used a few of the interior cuts from the front and embellished the inside.   My husband LOVES this card.

Saturday, January 15, 2011

Couple Things

The Sweet Magnolia Rose blog is having a great giveaway, check it out


Also, be sure to check out my Little Sisters new Blog, Cricut Crazed Lady, she is new a brand new Cricut owner (we got her an Expression for Christmas) and she is IN LOVE.   Hoping you guys can show her some love as well!  Good Night!

Pulling for Love

Pulling for love turned out to be a labor of love.  ;)   I cut the bird in the flip mode, at 1 1/2" from the Cindy Loo cartridge.  I honestly can't remember where the paper is from because I cut it three times before I was happy.   The papers were both polka dotted and the dots were glittered and then I used a white shimmer paper for her face.  I inked her in a darker pink then.  The initial inspiration was the mat printed stock from American Crafts Dear Lizzy collection with the banners.  So, I wanted to have two birds holding the love banner up but, then I decided two birds were too much.   I cut the letters from Nursery Rhimes at 3/4".   The banner paper was scraps that I had and once I cut them and added the letters, I decided they needed a shadow.   Sooo, I hand cut the brown shadow layers with some fancy scissors and I loved the way it turned out!   I used brads to attach them to the ribbon (from Michaels) and glued the ribbon under the birds beak to make it look like she was pulling the sign.   Once I got it all done, I thought it needed a little something else so, I added the hand cut clouds.   I inked the edges in blue and then, my little sis, The Cricut Crazed Lady, was crafting with me on that day and she suggested I ink silver over top of the blue to give the edges a shine.   Once I did so, I decided some texture was a must.   I ran some tape over the clouds using my ATG gun and added cotton from a cotton ball to make them look like really fluff white clouds!!!
On the inside, I mounted a larger piece of the pink polka dot paper and then two more clouds.   The larger cloud, I stamped with a sentiment from TPC Studio, Hugs and Kisses set and the smaller cloud I added cotton to.  I think it's super sweet!

Friday, January 14, 2011

Recycled Rings


Today's card is a wedding card. The gem rings were actually recycled from a table number sample that my cousin was thinking about for her wedding. This card is pretty simple because there are no Cricut cuts. The mat paper is from the DCWV Alphabet stack which I love because it's black and white glittered paper with lots of patterns, you can use it for soooo much! It's hard to tell but, the gray pattern on the white paper is glittered. I scalloped the bottom of each sheet with the EK Success scallop border punch. The rings I mounted onto shimmery silver paper and then onto black that I corner punched with a Fiskars corner punch.

Saturday, January 8, 2011

Circle Snowman


Today's card I saw in the Cardmaker magazine (I think that's the one) and I thought it was super cute. I cut the circles using George & Basic Shapes at 5 1/4", 5", and 4 1/2". I used some large black sparkley brads for his eyes and some small gemstones for his mouth. The nose and arms I cut by hand and I inked the edges of each circle.

On the inside, I mounted this sentiment that I printed on my computer 'Jesus loves you Snow Much'.

Final Christmas Explosion Box & TIPS for making them!


Today is the 10th box, my daughter's. I also went with a pastel theme but, candy & cookies instead of animals on this one.
I did use one Cricut cut and it was the candy tag from Very Merry Tags, cut and 1" and then trimmed off the hook at the top. I cut it using light and dark pink glitter paper from DCWV. Then I wrapped it with a piece of celophane to give it the appearance of real candy! The little pieces were cut using a mini punch from a Halloween set.


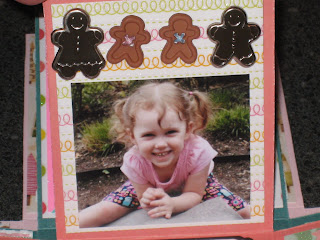
The other mat I loved was the Gingerbread mat. The 'mom' & 'dad' gingerbread are brads that came in a set from the Flower Factory and the two middle gingerbread buttons were from a pack I picked up at Michael's. I sewed one on with pink and one with blue to signify our family ;).


Before I go, here are some tips I have for you on making the boxes. The first is to keep in mind the scale of the boxes. I mentioned in one of the earlier posts that I bought several mini stamp sets to use on these. I also used some items that I had left over from making some mini trees a couple of years ago. The Christmas tree light garland on my son's box and the candy garland (below) were for mini trees. I also used some of the mini candy cane's on my niece's box. My last tip is concerning the lid to the boxes. In the instructions I have, it says to cut the box lid and 8"x8" and then score each side in 2". I did the first one like that but, the box lid is very tight and over time, it will probably show a lot of wear on the box. So, the rest of the lids I cut at 8 1/16" x 8 1/16" and then I scored them in 2" on each side. This makes the base of the lid just a little wider to have the lid go on and off smoothly. It did take me about 4 hours to create each box but, I tried very hard to make each one different and not repeat the same theme and embellishments. Good Luck in making some of your own!!!