
Today is the 10th box, my daughter's. I also went with a pastel theme but, candy & cookies instead of animals on this one.
I did use one Cricut cut and it was the candy tag from Very Merry Tags, cut and 1" and then trimmed off the hook at the top. I cut it using light and dark pink glitter paper from DCWV. Then I wrapped it with a piece of celophane to give it the appearance of real candy! The little pieces were cut using a mini punch from a Halloween set.

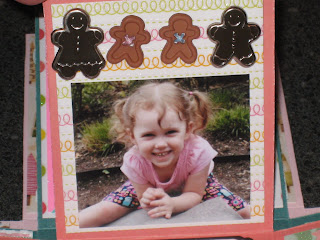
The other mat I loved was the Gingerbread mat. The 'mom' & 'dad' gingerbread are brads that came in a set from the Flower Factory and the two middle gingerbread buttons were from a pack I picked up at Michael's. I sewed one on with pink and one with blue to signify our family ;).
Before I go, here are some tips I have for you on making the boxes. The first is to keep in mind the scale of the boxes. I mentioned in one of the earlier posts that I bought several mini stamp sets to use on these. I also used some items that I had left over from making some mini trees a couple of years ago. The Christmas tree light garland on my son's box and the candy garland (below) were for mini trees. I also used some of the mini candy cane's on my niece's box. My last tip is concerning the lid to the boxes. In the instructions I have, it says to cut the box lid and 8"x8" and then score each side in 2". I did the first one like that but, the box lid is very tight and over time, it will probably show a lot of wear on the box. So, the rest of the lids I cut at 8 1/16" x 8 1/16" and then I scored them in 2" on each side. This makes the base of the lid just a little wider to have the lid go on and off smoothly. It did take me about 4 hours to create each box but, I tried very hard to make each one different and not repeat the same theme and embellishments. Good Luck in making some of your own!!!


The other mat I loved was the Gingerbread mat. The 'mom' & 'dad' gingerbread are brads that came in a set from the Flower Factory and the two middle gingerbread buttons were from a pack I picked up at Michael's. I sewed one on with pink and one with blue to signify our family ;).

Before I go, here are some tips I have for you on making the boxes. The first is to keep in mind the scale of the boxes. I mentioned in one of the earlier posts that I bought several mini stamp sets to use on these. I also used some items that I had left over from making some mini trees a couple of years ago. The Christmas tree light garland on my son's box and the candy garland (below) were for mini trees. I also used some of the mini candy cane's on my niece's box. My last tip is concerning the lid to the boxes. In the instructions I have, it says to cut the box lid and 8"x8" and then score each side in 2". I did the first one like that but, the box lid is very tight and over time, it will probably show a lot of wear on the box. So, the rest of the lids I cut at 8 1/16" x 8 1/16" and then I scored them in 2" on each side. This makes the base of the lid just a little wider to have the lid go on and off smoothly. It did take me about 4 hours to create each box but, I tried very hard to make each one different and not repeat the same theme and embellishments. Good Luck in making some of your own!!!


