So, in my craft world, the most exciting thing to happen this year is that I have been published in the January 2012 issue of Cricut magazine! Not only have I been published but, FOUR of my cards were published! I have agreed not to post any photos while the magazine is for sale but, I can tell you which cards and what pages they are on in the magazine. I already bought a copy myself! Couldn't be more excited about it!
Under the Stamping section, page 71, my 'It's your Day' card
Under the Quick and Easy section, page 87, my 'Damask' card
Under the Embossing section, pages 102 & 103, my 'Be Natural' and 'Need a Squeeze' cards
I hope you're able to check out the magazine and the other great work in there!! Enjoy!
Tuesday, December 27, 2011
Monday, December 26, 2011
Sew, it's your Birthday!

Dress form cut at 5 1/2" from Summer in Paris, using Design Studio to remove the center cut. Paper for the dress form is from DCWV Denim and then I used a brown sharpie to color the stand and the top 'knob', then used Glossy Accents to make them shiny, like finished wood. The mat paper is from Cosmo Cricket Material Girl and Salt Air collections. Ribbons and buttons from Making Memories. The sentiment was printed on my computer and I added the sewing needle and mini safety pin.

The inside used the same papers and a Studio G sentiment
Thursday, December 22, 2011
Shoes in Every Color

This birthday card today was a quick card that didn't use any Cricut cuts but, instead a Fiskar's stamp set. The base of the card is white cardstock and the mat is green. The top mat is from DCWV Letterpress stack (which is so cool). I stamped the shoe in green, brown, and yellow and then pop dotted them to green rectangles. The sentiment is from the same stamp set and says 'If the shoe fits, buy one in every color'.
The inside has two strips of the Letterpress paper and a Happy Birthday sentiment.

Tuesday, December 13, 2011
I'm Back!!!!
Hello my blogger friends (do I still have any?). I know, it has been forever since I have posted. I was very busy with the final stages of our house building and then moving. I really didn't think it would take as long as it did to get settled but, it did. So, with that said, we are now moved and mostly settled and LOVING our new home!!! I have a picture to share with you as well. We won't have a concrete drive until April and no grass until next summer but, we are loving it. Our neighborhood is perfect as there are 40 lots and they are all about 2-4 acres each. The nice thing about it is that everyone has plenty of room and doesn't have to be on top of each other but, we still live in a neighborhood. Our neighbors have been great too and I have made a friend already in the neighbor behind us. Our son's are the same age and they played flag football together as well as wrestling together now. So, it has been a huge blessing and we are very happy to be moved and settled.

Now, on with the crafting! I have missed crafting so much. I have done a few things but, only things that needed done, nothing 'just for fun'. I have some things to post so, I will start back to that this week. I've also been collecting some things to do my first giveaway!!! I'm thinking I might wait until just after the holidays and then do that. I hope you are all well and staying crafty yourselves!!! I have surely missed seeing every one's work!!! Stay tuned, more to come this week!
Saturday, August 13, 2011
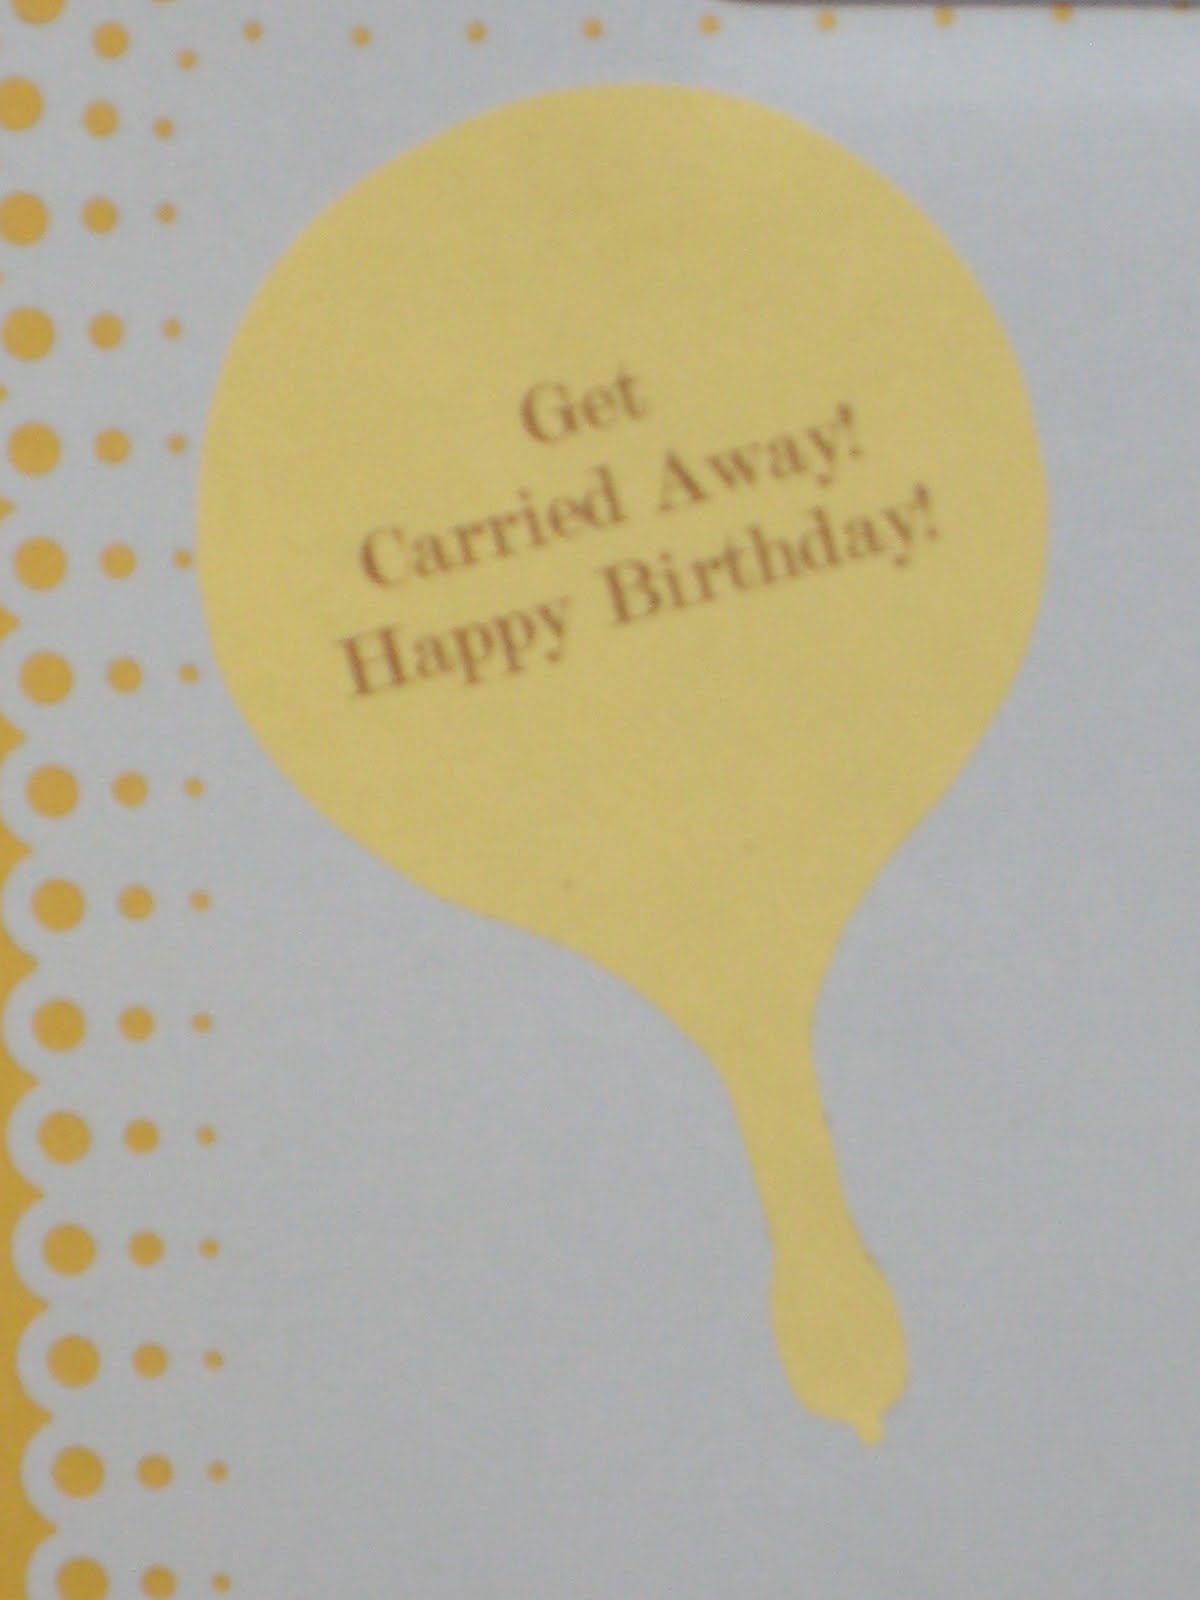
Carried Away.....

I'm totally loving today's card. I was up late last night, crafting, which is rare on a Friday because I am usually exhausted. I grew up in the country and often times, in the summer, we would see hot air balloons. Somehow they are just a sign of summer to me. I saw the 3D hot air balloon on a tag in a magazine and loved it! This is a square gate fold card with a yellow base. The blue mat is core'dinations paper and the hot air balloon print is American Crafts City Park collection (love it). The balloons were cut using the Summer in Paris cartridge and then I trimmed them down a little for each layer and cut off the 'strings' and basket. I put pop dots between the layers to make the stand up. I also added some string of my own and a basket and then inked all of the edges of the balloon's layers.

The frame behind the balloon was done with a Martha Stewart Punch around the page and then I put a piece of cardstock behind it so that the dots would pop out more. The stamp is from Studio 112. I used 4 different colors of twine from the Twinery, that I won from my blogger buddy, Amber, over at My 3 E Scrapbooking. Thanks Amber!

I used the same border punch for the inside mat and then cut a printed sentiment out with the balloon shadow for the inside. I had to cut the 'strings' off of the one inside because the paper was thin paper and the strings tore when cutting. :( I still like it though!
Leaving the Hive
 My oldest niece is now a high school graduate and is getting ready for her graduation party. Her school mascot is the Bee. I created this card using the Sentiments cartridge. The beehive was cut at 3" and the bee at 2". I used this honeycomb embossed paper that I picked up in a stack by Carson, at the Flower Factory. SUPER CUTE and fitting for the theme!
The card is a 5x5 square. The mat paper is from the DCWV Lemon Flower stack (her school colors are green and yellow). I have some silver plastic glitter ribbon from Christmas that I used a Fiskars border punch on (although you can't see it that well in the picture). I added these to the left and right side with thin strips of black ribbon. I pop dotted the hive and then glued the body of the bee but, pop dotted the wings to make them pop off the card. The stamp is from a Hamton Arts set.

On the inside, I printed the sentiment 'we heard you would bee leaving the hive. Congratulations' and stamped some little bees from American Crafts set. I used the same border punch on the yellow strips inside as well as the silver strips and black ribbon,
Saturday, August 6, 2011
Happy Birthday Little Lady

Hello all! Today is a card that turned into a bag and matching wrapping paper for my friend's daughter's 3rd BD. She loves Strawberry Shortcake and since that isn't a Cricut cartridge, I decided to just do strawberries.
The main cut here is the sentiment, cut from Birthday Bash at 3 3/4", It included a ladybug that I cut off to use later. I used solid pink for the shadow and cut the sentiment using TCP Studio Spring Break stack. The mat strawberry paper is from the DCWV Sweet stack and the frame is cut from the Just Because Cards cartridge, using the frame function of the Peas cut, at 6" from DCWV Nana's Kitchen paper.
The berries are cut from Preserves and then embossed with the Swiss Dots folder. I added a little American Crafts ribbon as well.
For the bag, I used the single Strawberry on Preserves and cut it at 4" I think. I also embossed it and inked the edges of the leaf. Have a great day all!
Wednesday, August 3, 2011
Sweet Berries


Monday, July 25, 2011
For the Record Bouquet

Today's Flower Bouquet was a first for me in making a bouquet. I made this for my mom using the Echo Park For the Record 6x6 stack and My Mind's Eye brads for the centers. I cut all the flower petals using Mother's Day Bouquet at various sizes using the printed paper and coordinating solid colors.

The flower 'stems' are bamboo skewers that I inked in green and the leaves are hand cut from folded paper. I embossed them using a Tim Holtz folder and then inked them and wrapped them around the stems and attached one side to the other, using ATG tape.

I inked all the flower petals and rolled the tips in and out. The bucket was $1 at Target and I filled it with a piece of foam and added some green crinkle shreds and a bow on the outside.


Sunday, July 24, 2011
Good Luck in Kindergarten
Just finished this one for a little friend of my son's. She's going to kindergarten next month. The card was cut at 6" from Wrap It Up. I cut the base in red and then the trim pieces in yellow. I used a Sharpie to color in the window trim and the roof of the bell tower. I cut the bell layer from the main cut. I also added a white sheet on the inside.


For the inside, I traced the exterior and then cut out the sheet, stamped it with the sentiment and added a piece of $1 bin ribbon from Target.

Saturday, July 23, 2011
Under the Sea Favors

This is my last Under the Sea post! These were the favors that I made for my daughter's party. I bought the mini takeout boxes and then cut strips of paper to wrap around them and added a 2" octopus from Birthday Bash for the boy boxes and a 2 1/2" seahorse from Create -a-Critter, to the girl's boxes. I added google eyes to all and stickles to the seahorses.

The tags were printed on my computer and then mounted and tied on with curling ribbon. That wraps up the week+ of Under the Sea party stuff. I love having the parties for my kids as I know they feel special and it really doesn't cost much when you are using paper. ;) Now I need to start my wheels turning on next year's creations!! Have a great weekend!
Wednesday, July 20, 2011
Under the Sea Invite
I had been thinking of ideas for my daughter's Under the Sea birthday party invites. Well, before I go on, let me just say that it was a good thing I only needed 18 invites or I would have been way over my head!
Well, this was a case where it took one product to get things in motion! I found these Martha Stewart Crafts glass microbeads on clearance at Michael's for $2.50 per bottle. I got the blue and the green. I decided to do a rectangle card and use my Fiskars wave border punch across the top of the front of the card. Then, I cut a second sheet but only about 1 1/2" wide and border punched it. I ran all of those through the sticker maker and then poured a mixture of the glass beads on top. This turned out pretty good! Pictures below show those steps.


Then, I cut another 1 1/2" strip and border punched it. I glued the beaded strip on top of the card front, just under the waves that were punched in the card base. Then, I glued the next, plain green strip on top of the beaded strip. My next layer was a piece of Bazzill double dot paper, cut down to about 4x4" and again, border punched across the top. Once I did that I thought, 'oh how cute real sand on the ocean floor would be' so, I used my ATG and added a small strip of glue to the bottom of each, with a little curve to it. I had some real sand that my little sis (Crazy Cricut Lady) gave to me and she also had the idea of adding gold glitter to give it a little sparkle. So, there I went.

This is the final layer with the sand added. But, I couldn't stop there when it came to added some visual texture! I had this decorative cord that I got on clearance a couple of years ago, after Christmas. It's feathery and I usually use it for wrapping BUT, when I cut the 'feathery' pieces back, it looked just like seaweed when it was attached to the card!!! Woohoo!

So, then my Cricut cuts. Using Life's A Beach, I cut the mermaid at 3" in a light yellow paper, her tail from Coordinations paper, her hair from kraft paper and then her top and flower using a solid pink. I added aqua colored Stickles to the scales that cut on her tail and then I inked it so that you wouldn't see the yellow of her body. I added a green pearl to her flower and inked in her facial features. I pop dotted her on but, used a little glue to glue down her hands (so her arms wouldn't get ripped off).
 I cut the coral from the LAB cartridge as well but, I found that it was easier on my machine (AND ME) to cut it at 4" and then cut them apart to make them smaller and use them on several cards instead of just one. I added yellow and orange stickles to some and then red pearl paint to the third, one for each card. The inside says "Mermaids and fishes under the sea are singing Happy 4th Birthday to Avarie!!! You are O-fish-ally invited to:"
Tuesday, July 19, 2011
Under the Sea Cutlery Caddy

A couple more posts left to go for my week of Under the Sea. Today, I have the cutlery caddy that I bought for a party last year. I re-did it this year with the theme. I covered it with blue paper and then a strip of green all the way around, border punched with the Fiskar's wave punch.
I can honestly say that I don't recall the measurements that these were cut at but the dolphines, shells, coral, mermaid, and seahorse were cut from Life's a Beach. I did add the eyelash ribbon for seaweed, some glitter stickles to the coral and liquid pearls to some of the shells. I also embossed the seahorse with the 'reptile' embossing folder from the Cuttlebug animal set. The mermaid had some stickles added and I used pen to add her face in.

On the opposite side, I added the whale from B is for Boy along with the shells, coral, and seaweed. I used double dot paper for his blue body, added stickles to his spout, and a black gem for his eye. This was also a big hit with the guests!
Monday, July 18, 2011
Something Sweet for a Summer BD?

Blog Giveaway!
Check out Melissa's Blog to enter for her great Blogaversary giveaway. How fun would it be to win!
Mussels in a Melon
Today's post is not a paper related one, it's a RARE food related one. I took a seedless watermelon and cut off a small portion of the one end and then used a melon baller to remove the watermelon fruit inside.

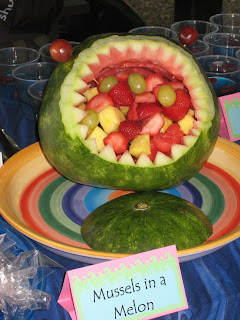

When I was done, I used a vegatable peeler and peeled back the edge around the 'mouth' and then used the Pampered Chef tool to cut the 'teeth' on this guy. Once at the party, I filled it up with fruit and then added some eyes, using toothpicks and grapes. This was such a hit and really was quick to do!

Friday, July 15, 2011
Fan Sea Fruit Buckets
Moving on with our Under the Sea party posts, today I have these 'buckets'. They are actually cheap plastic planters that I got for $1.49 each. I cut small pieces of styrofoam and put in them and then filled the rest with brown sugar and then added the fruit skewers.
The octopus on the front was cut from Birthday Bash at 4" in the purple polka dot paper from a K and Co baby stack. Then, I cut the solid layer at 4 1/4" just to give a layers effect. I added google eyes to each of them and the band of solid paper in the back, border punched with the wave Fiskar's punch. I loved how cut these turned out!

The octopus on the front was cut from Birthday Bash at 4" in the purple polka dot paper from a K and Co baby stack. Then, I cut the solid layer at 4 1/4" just to give a layers effect. I added google eyes to each of them and the band of solid paper in the back, border punched with the wave Fiskar's punch. I loved how cut these turned out!

Thursday, July 14, 2011
Under the Sea Centerpieces
Hello craft friends, hope you are all well today! If you happened to see my under water creation yesterday on the Decorate to Celebrate challenge blog, you probably wondered why I didn't have the second picture posted on my blog. Well, that was one of the 8 centerpeices that I made for the tables at my daughter's 4th BD party this past weekend.
To make these centerpieces, I got 8 different large molded foam pieces from our return center (that I mentioned in yesterday's post) and I covered them with blue tissue paper. The animals were all cut using my Cricut, two of each animal and then they were glued together with a floral pick taped in the center and google eyes added. I poked each one down into the foam piece. Once I had that done, I surrounded the foam with some blue cello and sea shells then I sprinkled brown sugar and swedish fish around to make it look like an ocean scene. The little animals around each one are bean bags that I picked up for 3/$1 at a local discount store (from Target though).
In an effort to not make this post a massive one, I am going to list the different animals that I cut, the sizes and the cartridges and then a picture after. Note that most of these cuts had to be moved around on Design Studio to make them at these sizes, sometimes hiding cuts.
This whale was cut from the B is for Boy cartridge at 14 1/2", I didn't cut his spout because I wanted him as big as I could get him.
![]()
![]()
![]()
Next we have the dolphin from Life's a Beach cut at 12" and the Seahorse from Create a Critter cut at 14"
![]()
![]()
![]() We also have this little whale from Create a Critter as well, cut at 11 1/2"
We also have this little whale from Create a Critter as well, cut at 11 1/2"
![]() And last, we have the Octopus from Birthday Bash, cut at 11 1/2"
And last, we have the Octopus from Birthday Bash, cut at 11 1/2"
![]()
To make these centerpieces, I got 8 different large molded foam pieces from our return center (that I mentioned in yesterday's post) and I covered them with blue tissue paper. The animals were all cut using my Cricut, two of each animal and then they were glued together with a floral pick taped in the center and google eyes added. I poked each one down into the foam piece. Once I had that done, I surrounded the foam with some blue cello and sea shells then I sprinkled brown sugar and swedish fish around to make it look like an ocean scene. The little animals around each one are bean bags that I picked up for 3/$1 at a local discount store (from Target though).
In an effort to not make this post a massive one, I am going to list the different animals that I cut, the sizes and the cartridges and then a picture after. Note that most of these cuts had to be moved around on Design Studio to make them at these sizes, sometimes hiding cuts.
This whale was cut from the B is for Boy cartridge at 14 1/2", I didn't cut his spout because I wanted him as big as I could get him.

Next is the Octopus from B is for Boy, cut at 11 3/4"

Then we have the Turtles from Life's a Beach, cut at 12 1/2" and two of them at 6 1/2" and some layers added

Next we have the dolphin from Life's a Beach cut at 12" and the Seahorse from Create a Critter cut at 14"

We also have two smaller dolphins cut at 6 1/4" and the jellyfish from Create a Critter cut at 13". On the jellyfish, I cut the tenticles off and added some ribbon for the new tenticles.

And, we have the Lobster & Crab from the From my Kitchen cartridge, cut at 13" (this was one that you had to hide one animal to cut the other at that size.


I have to admit that I was thrilled with the way these came out. I think I spent $8 on the roll of cello, $3 on the tissue paper, $5 on the floral picks (and I have over half the package left over) and then $6 in bean bag animals. I used the brown sugar and swedish fish for other parts of the party and got them both at Sam's so, I think total that was $10. So, it was very cost effective and then I threw it all away afterwards except my animals and sea shells!
Wednesday, July 13, 2011
Under the Sea Birthday Party!!!
A couple of weeks ago I was asked by the very talented Rhonda & Amy, over at Decorate to Celebrate! to be a guest designer for this week's challenge...A Child's Birthday. I was so honored to have been asked and then I realized, I needed to step up my game! :)
For this challenge, I created an under the sea oasis! It really was quite inexpensive to pull this off because most of the materials were recycled packaging!! The company I work for has a return center close to our headquarters so, I went over and collected the brown kraft paper that was already wrinkled up, some bright colored bubble wrap, and a couple other things that you might see in some later posts from me the rest of this week (wink wink).
![]() I taped all of the sheets of kraft paper to the deck and brought it up onto the rail as well. Then, I took two plastic table skirts that I purchased for $.50 each at a local discount store and attached them to the top of the rail to look like the water. I took some lightweight nets that I purchased for $1 each at Michael's and draped them across the back of the rail.
I taped all of the sheets of kraft paper to the deck and brought it up onto the rail as well. Then, I took two plastic table skirts that I purchased for $.50 each at a local discount store and attached them to the top of the rail to look like the water. I took some lightweight nets that I purchased for $1 each at Michael's and draped them across the back of the rail.
The centerpiece of this creation was a large vinyl seashell (sewn by my crafty mom) and a banner that said Happy 4th Birthday Avarie! I made the banner using my Cricut. I cut the seashell from the Create A Critter cartridge at 5 1/4" in blue and then a second layer of them at 4 3/4" in green. I cut the letters at 4 1/2" using Life's a Beach and then attached each piece to the next with brads and added some American Crafts wave ribbon for hanging.
![]()
For this challenge, I created an under the sea oasis! It really was quite inexpensive to pull this off because most of the materials were recycled packaging!! The company I work for has a return center close to our headquarters so, I went over and collected the brown kraft paper that was already wrinkled up, some bright colored bubble wrap, and a couple other things that you might see in some later posts from me the rest of this week (wink wink).

The centerpiece of this creation was a large vinyl seashell (sewn by my crafty mom) and a banner that said Happy 4th Birthday Avarie! I made the banner using my Cricut. I cut the seashell from the Create A Critter cartridge at 5 1/4" in blue and then a second layer of them at 4 3/4" in green. I cut the letters at 4 1/2" using Life's a Beach and then attached each piece to the next with brads and added some American Crafts wave ribbon for hanging.
Around the shell and banner, I stapled piles of tulle and the bright colored bubble wrap. I added some seashells that I was able to collect, some $1 inflatables that I also found at Michael's, and some balloons. And, the crepe paper you see in the first picture is a 'tp' job, of sorts. The rolls were thrown up into the tree and then cut in different lengths When the wind was blowing, it looked like peaceful ocean waves. Pretty darn good for recycled packaging I think!!

Thank you Rhonda & Amy for inviting me to be a Guest Designer this week! I am so thrilled and I hope you all enjoy my creation. Check back throughout the week to see my invite, favors, food containers, centerpieces and even my 'Mussels in a Melon' and, if you like what you see, become a follower!! Don't forget to join the challenge at Decorate to Celebrate and become a follower there too! Have a great day!!
Monday, June 27, 2011
Project Voting
So, over at Scrappin with Cricut, I entered my Rocket Favors and it is now up for voting for the best No CARD or LAYOUT Monday. Check it out!! Thanks!
Thursday, June 23, 2011
New 'dog' Home
A close friend and her fiancee just bought a massive old tudor home that they are completely in love with. I haven't been able to visit yet with my own house stuff going on but, I am sooo looking forward to it. They have three massive dogs as well so, what better themed card?

 This was cut using the card function of A Child's Year, at 5". The cut includes the scallop and the bones cut out. I assumed the layer for this would fit inside but, that wasn't the case so I had to cut it down to make it fit. Sentiments are from Studio G and paper is from SEI.
Sunday, June 19, 2011
A Birthday On the Go

Who says you can't use 'B is for Boy', for a girl card? The car was cut at 4" from B is for Boy, using paper from the DCWV The Stack 6. I also used some brads on the wheels and didn't glue them, so that they can spin.
 The background paper is from Best Occasions, as well as the tag. The 'Ready Set Go' is an Imaginisce stamp and some pink and white Twinery twine. I also used a Sizzex folder to emboss the yellow sheet across the bottom and a piece of ribbon.
Subscribe to:
Posts (Atom)