For the LOVE of PAPER!!!

Showing posts with label Create A Critter. Show all posts

Friday, February 13, 2015

Buggy on Valentine's Day

This little cutie was made using Create a Critter, cut at 4" with the layers.  The wings and heart were cut from a K&Co glittered paper and then I used the dots from the wings and glued them to the top of the antenna's.  I also added some google eyes.
The mat paper is from My Mind's Eye Love Me collection.   The felt rick rack is from the Target dollar bin.   The stamped sentiment from Studio G and the buttons were sewn on using red and white Martha Stewart Baker's Twine. 

Thursday, November 15, 2012

Giraffe Baby Shower


My cousin recently had her baby shower and this was the card I made.   The card is business size so, I cut the giraffe from Create a Critter at 6".  I used some brown and cream colored yarns to create a mane for the giraffe as well.   The paper is from Fancy Pants Designs, Baby Mine collection.   The ribbon is from Hobby Lobby and the stamp from Inkadinkadoo.  

Tuesday, November 6, 2012

Fire Hose Girl Scout SWAP


Hello all!  This isn't a paper project....well kind of if you count the fire hydrant but, this is a SWAPS that I made for our Girl Scout troop's trip to the Fire Station. SWAP's are Special Whatchamacallits Affectionately Pinned Somewhere.   The Girl Scout troops make them when they go to special events/field trips and then they trade with other troops when they are at larger, regional events.  The idea is to make something to remember the event but, to make it as cheap as possible and recycle if you can.

For this one, this was a 'fire hose' that I made using a couple feet of white rope, some $.19 brass plumbing fittings and a blue grocery store back that I cut to look like water coming out of the hose.   I cut the Fire Hydrant's using the Create a Critter cartridge at 1" and I added the troop information on the back, used an eyelet on the top and hung them from the pin that is hot glued to the back of the rope.  We were really happy about how these turned out!

Thursday, July 12, 2012

Jungle Themed Centerpieces (PART 2)


Here are some follow up pictures to my earlier post for the Jungle Centerpieces HERE


Jungle Centerpiece


I'm not sure why I hadn't posted this one but, these were the centerpieces that my little sis and I made last year for a baby shower for our cousin!   We thought they turned out wonderfully and so did the guests!  Animals are from Create a Critter:  Giraffe's at 7" and 10", each cut twice with the second cut being done in reverse so that each animals is double sided.  In between the two giraffe layers, there are short pieces of brown pipe cleaners glued to the giraffe's legs and then poked through the cardboard base and taped to under side of the base, to make the giraffe's free standing.  The Monkey's cut at 3" and 4 3/4". 

The rolled 'bark' on the trees was the most work, my little sis's idea!  The palm trees are paper towels rolls covered with various brown & tan colored oval shapes, cut using an EK success oval punch and then rolled with pens and glued to the paper towel roll.   The palms were cut from Dinosaur Tracks at 10 1/2" and then each palm cut and pop dotted on top of the 'tree'.

The grass was fringed using Martha Stewart Crafts fringe scissors.  The larger monkey was hung from natural colored raffia ribbon that was taped onto each tree before the palms were added to the top.  We made several different variations so I will post those pictures as well.

Thursday, March 29, 2012

Altered Thank You's


As a gift to the Soon To Be mom, I bought some simple Thank You's that were printed in gold and I added the same nest and eggs that I used to make the invites.  The nest is from Create A Critter and the egg is from Straight from the Nest.   I included address labels and stamps for her as well!

Monday, March 19, 2012

Adding to the Nest Invitation

I am starting to add some details about the Party Ensemble that I posted previously.   To start, we have the invite.   I started with a chocolate brown 5x7 sheet that I rounded the corners on and then an off white layer that I rounded the corners on and border punched with a Martha Stewart border punch that features these cute little birds perched on branches. 
The top layer is a gold metallic vellum from The Paper Studio (Hobby Lobby).   These printed so well with the invite information!  I added a strip of cream and gold ribbon across the top and then added a nest cut from Create A Critter.   It's the Accessory cut of the Chick, cut at 1 1/4" and I cut two of them.   The first one, I glued to the invite and then I added the egg, cut from Straight From the Nest.   The cut was the Nest Shift, using real dial size at 1 1/4" and inking the edges in a tan color.   Then, I added a little real feather and a second nest cut on top of it, that was attached using pop dots.  
I love the way that these turned out because it'd very elegant versus 'baby'. 

Saturday, March 10, 2012

Adding to the Nest Party Ensemble

Hello everyone!  Today is  BIG post kind of day!   Over at the Paper Crafts blog, they have a challenge to create a party ensemble.   The challenge is in celebration of their new book, Party Ensembles.   Check it out HERE.
So, my ensemble is done.   I would have liked to do more but, honestly the 2 foot rosette sign has really caused me to lose sleep!!  It took an entire day for me to do but, I LOVE IT!!!   I will give some details but, not too much.   I'll do some posts to provide the details of each item later.   But for now, here it is.   The theme is 'Adding to the Nest' and it's for a baby shower.

The 2' rosette was made using a Martha Stewart border punch, my scoreboard, my Cricut, the Ribbons and Rosette's cartridge, the Straight from the Nest cartridge, paper and a hot glue gun!

Included with the Rosette Sign is a decorative napkin ring, an invitation, a favor and a tent card for the food. 

The invite and the tent card feature the Martha Stewart border punch with birds perching on branches.  The invite is three layers with a chocolate brown, a tan, and then a gold metallic vellum paper that was printed with the invitation.   I added a nest from Create a Critter, a little egg and a real feather to accent.
The tent card was a chocolate brown layer with a tan layer and then chocolate again and a printed sheet that I inked a little to relieve the stark white color.

The favors are one of my favorite parts.   They are No Bake Cookies with a Reese's Pieces egg (since this is that time of year).  The tag is from the Storybook cartridge with a stamped sentiment.   I tied the tag on with three different colors of ribbon.
And the napkin ring was made out of the gold metallic paper, border punched with the Martha Stewart punch, again, and then attached with some glue tape.   I also added the same three ribbons around the napkin ring, as I did the favor.  I really love how this all turned out!!!

Monday, February 13, 2012

Love Bug

A little Valentine's card today for my daughter this year.  The ladybug is from Create A Critter, cut at 4".  The phrase was cut as well, at 2 3/4" and using the red glittered paper for the word love.   I used red glitter paper to cut the wings and then glued the dots from her wings onto the antena's. 

The mat paper is from Martha Stewart's 2011 Valentine's Day stack.   The die cut hearts are from the K&Co. Smooch line and the border is from the Target dollar bin.   On the inside, I added a strip of paper and a TPC sentiment.  Happy Valentine's Day!!!

Saturday, January 7, 2012

Pin the Nose on the Reindeer & Blog Candy!

Today I have a Cricut project that is NOT a card!!  ooohhh  ahhhh!   OK, so, seriously, this is a game that I made for my son's first grade Christmas party.   Unfortunately, my son wasn't able to attend the party because he came down with pneumonia right before Christmas but, I was told that the rest of the class really enjoyed it!

I covered a large piece of chipboard with navy blue specked cardstock (two sheets that meet right under the reindeer's right antler) and then hand cut the snow drifts and glued them on.   The trees were quick cuts from Joys of the Season in various sizes and the stem of the tree trimmed off. 
The reindeer that is flying over was cut at 11 1/2" using Create a Critter with all layers, although I didn't use the nose.   For the nose, I added a strip of the 'hook' part of velcro and then glued the 'pile' side to a large red pom pom, for pin the nose on the reindeer. 

I also added some white snowflakes that were cut from a different project via a Martha Stewart Crafts border punch.  Make sure you leave a comment on my January 1 blogcandy post....only one week left!!

Saturday, July 23, 2011

Under the Sea Favors


This is my last Under the Sea post!  These were the favors that I made for my daughter's party.   I bought the mini takeout boxes and then cut strips of paper to wrap around them and added a 2" octopus from Birthday Bash for the boy boxes and a 2 1/2" seahorse from Create -a-Critter, to the girl's boxes.   I added google eyes to all and stickles to the seahorses. 

The tags were printed on my computer and then mounted and tied on with curling ribbon.   That wraps up the week+ of Under the Sea party stuff.   I love having the parties for my kids as I know they feel special and it really doesn't cost much when you are using paper.  ;)  Now I need to start my wheels turning on next year's creations!!   Have a great weekend!

Thursday, July 14, 2011

Under the Sea Centerpieces

Hello craft friends, hope you are all well today!   If you happened to see my under water creation yesterday on the Decorate to Celebrate challenge blog, you probably wondered why I didn't have the second picture posted on my blog.   Well, that was one of the 8 centerpeices that I made for the tables at my daughter's 4th BD party this past weekend.  

To make these centerpieces, I got 8 different large molded foam pieces from our return center (that I mentioned in yesterday's post) and I covered them with blue tissue paper.   The animals were all cut using my Cricut, two of each animal and then they were glued together with a floral pick taped in the center and google eyes added.  I poked each one down into the foam piece.   Once I had that done, I surrounded the foam with some blue cello and sea shells then I sprinkled brown sugar and swedish fish around to make it look like an ocean scene.   The little animals around each one are bean bags that I picked up for 3/$1 at a local discount store (from Target though).

In an effort to not make this post a massive one, I am going to list the different animals that I cut, the sizes and the cartridges and then a picture after.  Note that most of these cuts had to be moved around on Design Studio to make them at these sizes, sometimes hiding cuts.

This whale was cut from the B is for Boy cartridge at 14 1/2", I didn't cut his spout because I wanted him as big as I could get him.

Next is the Octopus from B is for Boy, cut at 11 3/4"

Then we have the Turtles from Life's a Beach, cut at 12 1/2" and two of them at 6 1/2" and some layers added


Next we have the dolphin from Life's a Beach cut at 12" and the Seahorse from Create a Critter cut at 14"
We also have two smaller dolphins cut at 6 1/4" and the jellyfish from Create a Critter cut at 13".   On the jellyfish, I cut the tenticles off and added some ribbon for the new tenticles.

And, we have the Lobster & Crab from the From my Kitchen cartridge, cut at 13" (this was one that you had to hide one animal to cut the other at that size. 

We also have this little whale from Create a Critter as well, cut at 11 1/2"

And last, we have the Octopus from Birthday Bash, cut at 11 1/2"
I have to admit that I was thrilled with the way these came out.   I think I spent $8 on the roll of cello, $3 on the tissue paper, $5 on the floral picks (and I have over half the package left over) and then $6 in bean bag animals.   I used the brown sugar and swedish fish for other parts of the party and got them both at Sam's so, I think total that was $10.  So, it was very cost effective and then I threw it all away afterwards except my animals and sea shells!

Wednesday, July 13, 2011

Under the Sea Birthday Party!!!

A couple of weeks ago I was asked by the very talented Rhonda & Amy, over at Decorate to Celebrate! to be a guest designer for this week's challenge...A Child's Birthday.  I was so honored to have been asked and then I realized, I needed to step up my game!  :) 

For this challenge, I created an under the sea oasis!  It really was quite inexpensive to pull this off because most of the materials were recycled packaging!!   The company I work for has a return center close to our headquarters so, I went over and collected the brown kraft paper that was already wrinkled up, some bright colored bubble wrap, and a couple other things that you might see in some later posts from me the rest of this week (wink wink).

I taped all of the sheets of kraft paper to the deck  and brought it up onto the rail as well.   Then, I took two plastic table skirts that I purchased for $.50 each at a local discount store and attached them to the top of the rail to look like the water.   I took some lightweight nets that I purchased for $1 each at Michael's and draped them across the back of the rail. 

The centerpiece of this creation was a large vinyl seashell (sewn by my crafty mom) and a banner that said Happy 4th Birthday Avarie!  I made the banner using my Cricut.   I cut the seashell from the Create A Critter cartridge at 5 1/4" in blue and then a second layer of them at 4 3/4" in green.   I cut the letters at 4 1/2" using Life's a Beach and then attached each piece to the next with brads and added some American Crafts wave ribbon for hanging.

Around the shell and banner, I stapled piles of tulle and the bright colored bubble wrap.   I added some seashells that I was able to collect, some $1 inflatables that I also found at Michael's, and some balloons.  And, the crepe paper you see in the first picture is a 'tp' job, of sorts.  The rolls were thrown up into the tree and then cut in different lengths   When the wind was blowing, it looked like peaceful ocean waves.  Pretty darn good for recycled packaging I think!!

Thank you Rhonda & Amy for inviting me to be a Guest Designer this week!  I am so thrilled and I hope you all enjoy my creation.   Check back throughout the week to see my invite, favors, food containers, centerpieces and even my 'Mussels in a Melon' and, if you like what you see, become a follower!!  Don't forget to join the challenge at Decorate to Celebrate and become a follower there too!  Have a great day!!

Thursday, February 3, 2011

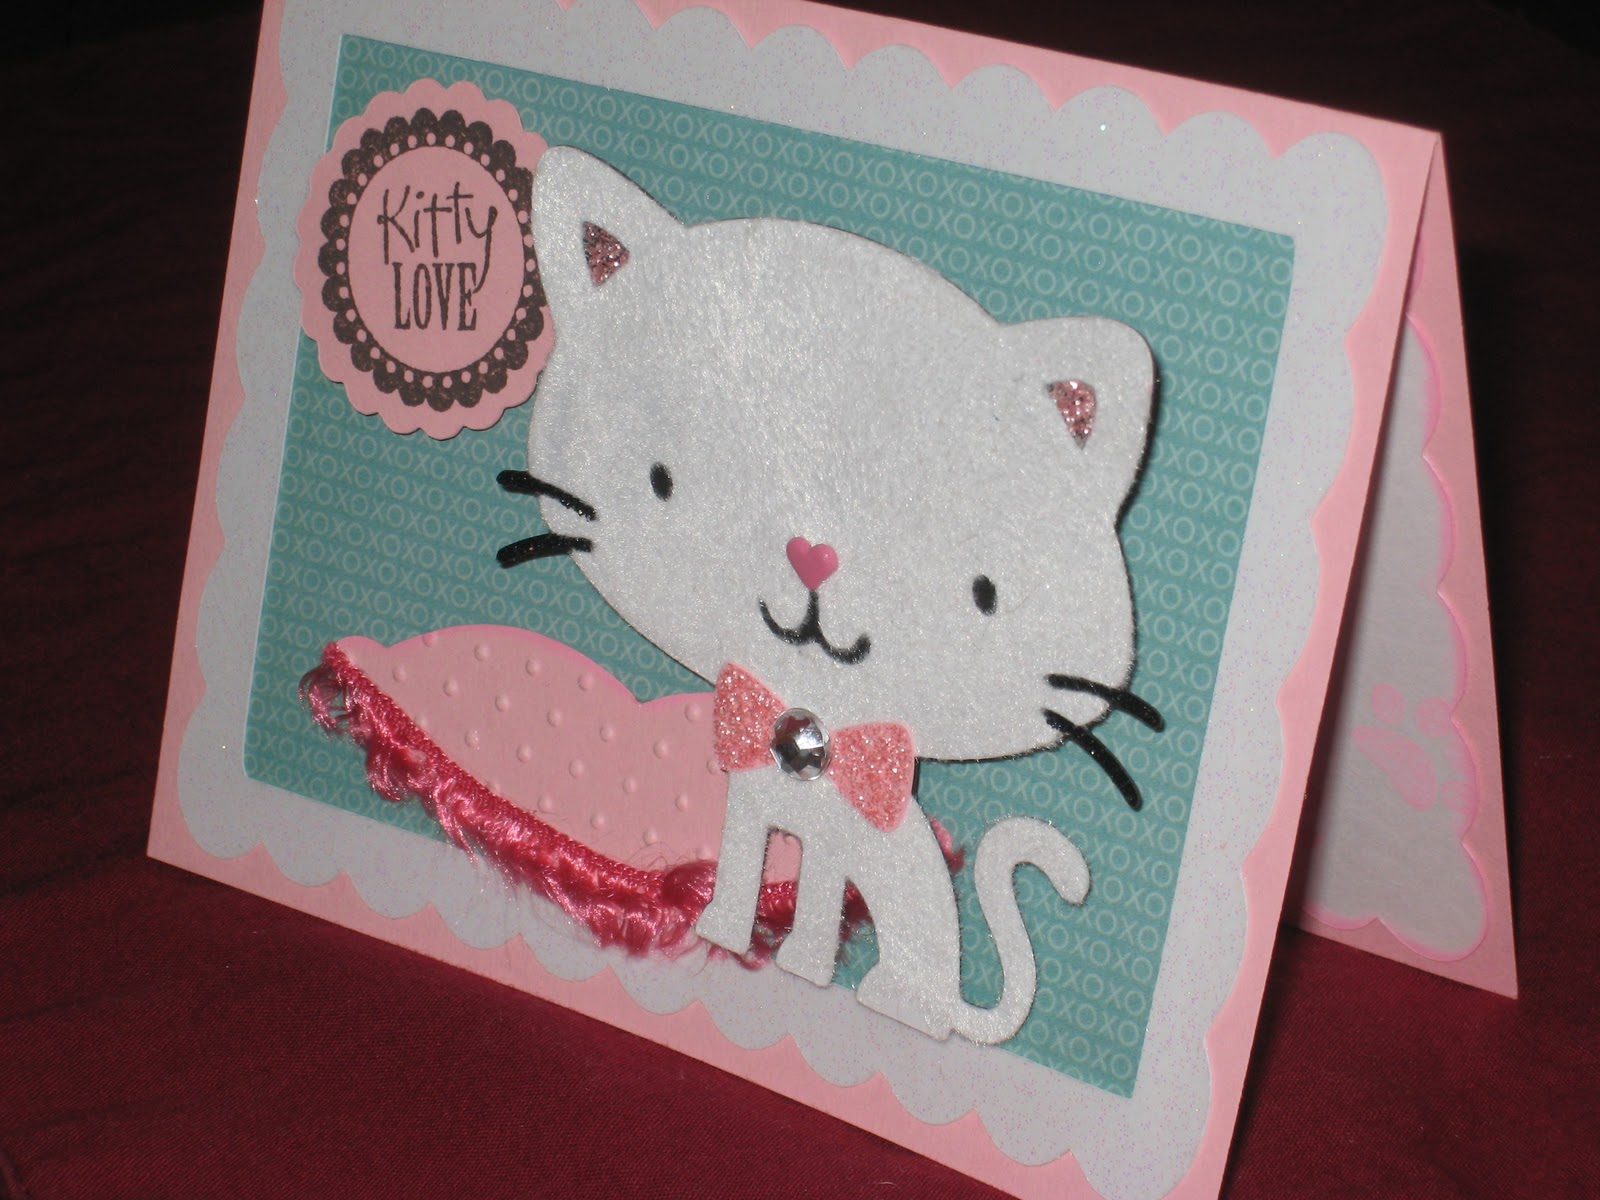
Kitty Love with a Wobble!

I think this cutie kitty card is going to be for my daugther.  The cat was cut using Create a Critter at 3".  I decided to use fun flock and make her furry.   If you're new to fun flock, there are a couple of tips:

1.  run the item through your Xyron upside down to get an even sticky surface.
2.  Once you're run it through, if you have the larger Xyrons, like I do, you should take your glue remover (this is an uneven surface rubber eraser like item) and remove glue in places you don't want it.   For example, I rubbed it over the cuts for the whiskers, over her eyes, mouth and ears to get rid of excess glue that I don't want to fight with once I add flock.
3. Pour the flock onto your item, over top of a piece of paper so that you can pour the excess flock back into the container.  Once you have the entire item generously covered with flock, use your finger to press the flock into the surface of the item.  Then rub off excess.

  I decided not to use the Cricut nose for her and instead used a heart brad.   Then, I used cotton candy stickles on the inside of her ears and black diamond stickles on her whiskers.   I also used stickles on her bow and added a big 'diamond'gem. 

So, I made the kitty wobble as well which was a first for me.   I have seen the action wobbles but, I decided to try to make them myself so, I bought some 26 gauge copper jewelry wire for less than $3 and cut about a 2" piece.   I wrapped it around my finger and then taped it to the card and the other side to the kitty.   It worked perfectly.   NOTE:   My first instinct was to make a larger wobble but, it doesn't work well, it only allows your item to wobble all over the place versus wobbling in the spot you want.   Next time I do one, I will take a picture of the wobble inside as well, sorry I didn't think of that until now!

So, when I went to cut the pillow, accessory, I assumed I should cut at 3".  It was huge.   So, I re-cut it at 1 1/4".   I ran it through the Cuttlebug using Swiss Dots and then added the 'fringe' ribbon on the bottom.  The stamp sentiment is from a G Studio mini set that I picked up for $.49 on clearance.   I stamped it on the pink scallop that I cut using the Preserves cartridge, the Apple4, lid cut at 1 1/2".

The mat aqua paper has xo's on it and is from the DCWV Madly in Love stack.  Then, I cut the scallop cut, also using Preserves.   The cut was the card cut on the Plum2.   I had to cut it using DS though because I needed the cut to be 5 1/4 x 4" and I used the DCWV Christmas Glitter stack for it, in white.

The inside, I cut the mat on white cardstock by going into the DS frame about and just hiding the inside cut of the frame.  I inked the edges in pink and then stamped the sentiment and the little paw prints in the same pink.  Have a great day everyone!

Angie

Wednesday, January 5, 2011

Gabby Girl Explosion Box


Box #8 is my other niece. I went with a pastel Christmas theme that included an animal theme. She's a huge fan of Webkins so what better?


I cut the seal from the Create A Critter cartridge. I cut it at 1" in light pink and dark pink. I ran the top, dark pink layer through the Xyron machine and then added pink glitter. I also added small black gems for the eyes. For the background, I cut this shiney, light blue sparkle card stock in the shape of a big ice cube and used the Martha Stewart drippy border punch on the bottom. Then I cut some smaller 'ice cubes' and used a corner rounder on them and inked them. I was very pleased with how the seal turned out!


A few of my other favorites were this deer cut out that came in the K & Co. Swell Noel grand adhesions collection. My little sis found a great deal on several different K & Co. adhesion collections at a local closeout store for $.99 each. They are super cute and I used many of them on this box. Not to mention they are about $3.49 in stores right now so, what a great deal!


I also used the EK Success tree border punch on this box. As you can see, I punched it on a light colored paper and then used green glitter glue from Studio G across the trees. I also used my snowman punch and then glittered it using Cotton Candy stickles.

Sunday, January 2, 2011

MPS Design Team Challenge

Robyn, My Pink Stamper, is having a challenge over on her blog to pick two Design Team members for her blog, for the next term. The challenge is to make something using pink, green, brown and another color if you choose, along with your favorite Cricut cartridge. Check the challenge out and all the submissions, there are lots of great entries! The link is http://www.mypinkstamper.com/2011/01/my-pink-stamper-design-team-2011.html. You must have a blog and a Cricut to join the challenge/be picked as a Design Team member. Good Luck to all!


For my submission, I decided it was time to bust out with some Valentine's creations. Christmas is over and after making 10 explosion boxes for my family, I was ready to move on. :) My favorite cartridge (although so hard to choose) is Create-A-Critter so, I decided on the owl (second key) at 3 1/4" along with the accessory key branch and then I decided on a 5x7 easel card.


The paper I used is from the latest Martha Stewart V-Day stack. I embossed the pink base of the owl with the Cuttlebug Swiss Dots folder and I added some craft paper behind the eyes to change the color, after I decided to use brads for eyes. I cut the beak by hand and then used Cotton Candy stickles on the beak and the inner ears and I used Star Dust stickles on the front, white feathers. The eye brads are from Eyelet Outlet. After I assembled it, I chalk inked the edges with Color Box pink pastel chalk. I also inked the brown branch with the Pink Pastel chalk and then embossed the leaves only with the Cuttlebug Floral Screen folder and then inked it with the Versa Ink 'tea leaves' chalk. I glued the branch down but pop dotted the owl.
The sentiment bubble was cut from the phrase function on the seal key at 1 1/2" and then I printed the sentiment on my computer. I border punched all three mat layers using the EK Success scallop border punch.


On the inside, I border punched the red mat and then mounted the sentiment on more craft paper and then the MS patterned stock and then the rest of the printed sentiment. The hearts are brads from a Recollections set. The sentiment was pop dotted so that it will stand up to create the easel.

I think the card turned out super cute and I know just who I will send it to when the time comes!! The challenge closes on Wednesday and Robyn will pick the two Design Team members on Friday. Good luck to everyone who enters the challenge!!

Tuesday, October 12, 2010

Birthday Martini


Today's card is a birthday card although, there is still plenty more Halloween to come, not to worry. :) I started with a maroon base card that is embossed with a basket weave (pretty cool), a solid pink sheet mounted on top and then a sheet from the DCWV All Dressed Up Glittered stack mounted on the front. There are two pieces of ribbon, solid black and a glittery silver. The martini is cut at 3" with the layers & shadow, using the From My Kitchen cartridge. I used Create A Critter to cut the shape that the sentiment is mounted on. It's the phrase creative feature on the Raccoon key at 1 1/2" in pink and then 1 3/4" in the maroon. The sentiment is from Fiskars birthday set.


On the inside, I added another solid pink mat and then a piece of the trimmed polka dot sheet from the front. The sentiment is a stamp from Stampology.

Thursday, September 2, 2010

Birthday Dreams


Today is a birthday card for my boss. She's an animal lover so, what better than the Terrier from Create A Critter. The mounted paper is from the DCWV 'The Stack 6' and the scallop border at the bottom is a Fiskars border punch. The terrier was cut at 3" with the layers. I stamped the 'dream bubble' onto white cardstock and then cut it out. I then cut the bones inside using the terrier key, layer 3 shift, on Create a Critter. I cut them at 1/4", 1/2", and 3/4" sizes and then pop dotted the terrier and the bubble. The interior is a birthday wish sentiment from Scrappy Cat.

Wednesday, July 28, 2010

Pink for Monique!!!


I am a little behind as I have been so busy making some wedding invitations but, I did manage to get a card made for Monique. Monique is a fellow blogger who I have been following for a while, who recently found out she has breast cancer. You can check out her blog at http://monkeydoodlecricut.blogspot.com/. Robyn, My Pink Stamper, started a campaign to flood Monique's mailbox with pink. So, here is what I came up with.

I actually used FOUR cartridges to make this card. I started with a #10 envelope because I picked up a pink ribbon car magnet to send with it as well. I cut a brown card and then matted a printed sheet from DCWV's The Stack 6. The print is trees and birds and then I inked the edges with brown ink to make it flow more.

The bear at 5" using Create A Critter cartridge but, I decided not to use the layer that gives her a dress. I just wanted it to be a plain bear. I love that the cuts on this cartridge can be made plain as well as with the 'extras'. I cut the base in brown, then the next layer in light pink and then the top layer in a darker pink. I glued the two pink layers together and used Tim Holtz's Burlap folder to emboss them. After I embossed them, I glued them to the brown base. I used pop dots to attach the bear.

Then I got out my Give A Hoot cartridge and cut the phrase "Bear Hugs for Trees" at 1 1/2". As you can see, I didn't use the 'for trees' part of it. I also cut the grass at the bottom of the card using the Give A Hoot as well. I cut it at 1 1/2" using the border function of the deer key. It cut with flowers on it but, I didn't want to add more color to the card so, I cut the flowers off.
The pink breast cancer 'ribbon' was cut using the Stand & Salute cartridge. I cut it at 2 1/2" using the same two pink colors & the shadow function of that key.

On the inside, I mounted a pink sheet of paper with an xoxo ribbon that I got from Michael'. The phrase 'For You' was cut using the Wild Card cartridge. It's the phrase creative function on the present card key. I had to cut it at 10" since this cartridge is specifically meant to make the cuts based on the size of the card you are cutting. I mailed this out to her last week so hopefully she has already received it. Keep the faith Monique, all your paper crafting friends are praying for you!!!!

Sunday, July 11, 2010

A little birdie told me...


Happy Birthday Em!!!! Made this one for my friend's daughter's 6th BD. I used Core'dinations solid card stock to make the birdie from Create A Critter at 3 1/2". The printed paper is from The Paper Studio Poteeka Souffle stack. I think the ribbon is from Michael's and the sentiment from the Fiskars kids birthday stamp set. I added a strip of the peach colored paper and the printed to the inside as well as another birthday sentiment.